Instagram filters are a girl’s best friend.
I remember the first time a friend said to me, “Don’t post that without a filter!” Being new to Instagram at the time, I wasn’t quite sure what she meant. But just a few quick taps, and I immediately understood.
Filters go beyond personal social media posts. If you’re practicing Instagram marketing, filters are how you move your post from amateur to artistic with photos that have a professional feel.
First, let’s take a look some of the world’s most-loved Instagram filters.
As we’ll discuss later, the best Instagram filter for your post will vary based on your audience and the photo itself.
In this article, we’ll touch on the following topics. Jump ahead to the chapter you need or start at the beginning with the world’s most popular Instagram filters.
Ready for some #filterfun? Let’s get started!
Around the world, there is one filter that wins time after time on Instagram: Clarendon.
According to a study by Canva, not only is Clarendon the most popular filter in every single state across the United States, it is also the favorite filter in 119 countries.
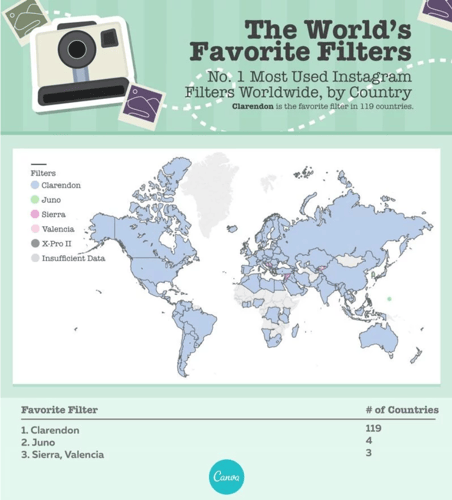
Image source: Canva
When looking at the Instagram filters that are the most popular, you may be wondering how the brand created those filters. Let’s take a closer look.
Instagram co-founder Kevin Systrom has a passion for photography. During a trip to Mexico, his girlfriend wasn’t satisfied with the picture taken on her iPhone 4.
Like so many of us, she was hesitant to share anything less than perfection on social media. The solution? Instagram filters we’ve come to know and love were born.
As Kevin shares, “She was like, ‘I don’t think I’m going to ever use this app... [M]y photos aren’t good... [T]hey’re not as good as your friend Greg’s.’ I was like, ‘Well, Greg filters all his photos.’ And she looks at me and she’s like, ‘Well, you should add filters then.’”
Recognizing a good idea when it presented itself, Kevin agreed and created X-Pro 2 then and there – the very first Instagram filter.
Kevin was kind enough to give some insight into Instagram’s creation of filters to a Quora question in January 2011:
“It's really a combination of a bunch of different methods. In some cases, we draw on top of images. In, others we do pixel math. It really depends on the effect we're going for.For instance, Lomo-fi really isn't much more than the image with boosted contrast. Whereas Toaster is one of the most complex (and slow, yet popular) filters we have with multiple passes and drawing.I'd give up more info, but it's our secret sauce :) Maybe someday…”
Some industries, especially B2C industries, rely heavily on Instagram to generate brand awareness and followers through beautiful photos.
These industries include nature (great for photographers and those in the travel industry), fashion, and food.
In Canva’s worldwide analysis of Instagram filters, the free design software platform found which filters are likely to get you the most likes in each of these industries.
After this section, you’ll find a chart comparing which filters get the most likes across food, fashion, nature, and selfies. Then, in the next section, you’ll find side by side examples of every filter on the list.
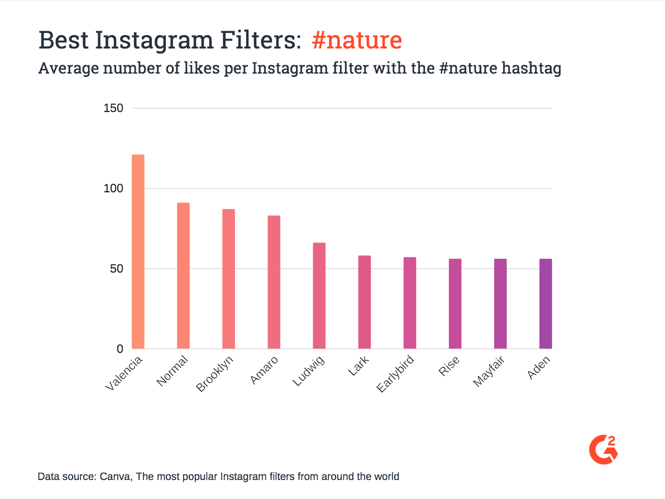
Running a business based on travel or tourism? Perhaps you’re a photographer who travels the world, or you’re just a fan of the earth’s pristine beauty.
Whatever the case, these are the best filters to use for your nature posts on Instagram.
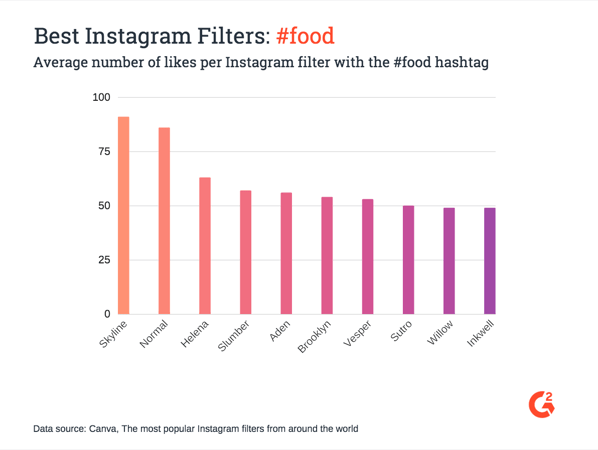
Whether you’re running a restaurant or food truck, cooking classes or a personal chef service, or you’re a full-fledged passionate foodie, here are the posts to use when posting food on Instagram.
Whether you are a fashion brand, running a boutique, or a lifestyle blogger, fashion filters are without a doubt a sign of industry trends.
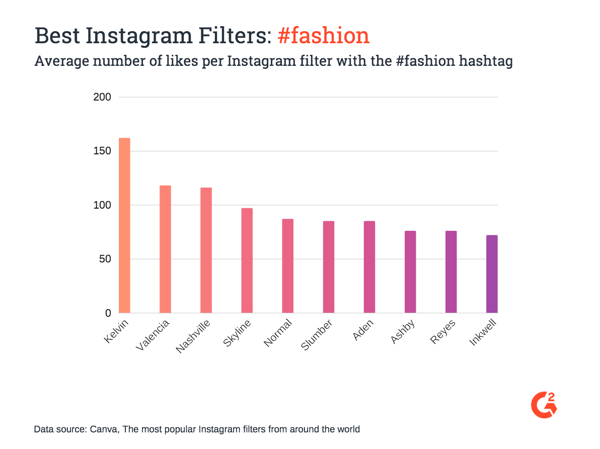
While Kelvin is popular for fashion posts, it doesn’t even make the list for any other industry. Huffington Post describes Kelvin as best for: “Using it ironically, because it’s Kelvin.”
Perhaps that’s exactly why it’s so popular within the fashion industry. Time will tell if (to echo the words of Project Runway), “One day Kelvin is in, and the next, it’s out.”
As you looked at the filters that made the list for food, fashion, and nature, you may have noticed some names come up more often than others. Curious which filters work best across all audiences?
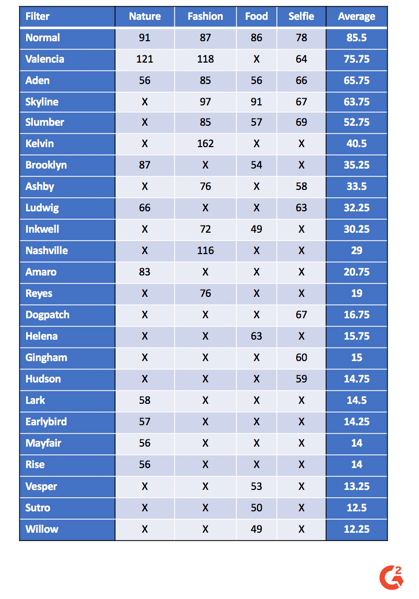
The following table breaks down the average number of likes per Instagram post with the #nature, #fashion, #food, and #selfie hashtags across all of the industry data.
x = Insufficient data
|
TIP: Maximize your likes when choosing your hashtags with hashtag monitoring software.
|
The filters chosen for this list of the top 29 Instagram filters are based on the Canva data previously mentioned. All filters either garnered the most likes within an industry or are popular worldwide.
Given how the popularity varies, the first filter is “Normal,” then they are listed alphabetically.
While it’s not technically a filter, we’re going to start the list with “Normal,” or no filter, on Instagram, as this is the most popular type of post.
According to Iconosquare, 89.5 percent of posts in 2017 had no filter. Sometimes, people don’t use a filter simply to save time. (Which, speaking from personal experience, is smart. Get it posted instead of waiting for the time to find the perfect filter and the perfect caption; otherwise, you might never post that picture at all!)
Other times, pictures are so perfect, you want to share them in their unedited form. Not using a filter is even something to brag about, hence the rise of the #nofilter hashtag.
Some people also use photo editing software in programs like Photoshop before uploading their pictures to Instagram. You might also want to check out these stunning filters outside Instagram. In this case, the images appear as “no filter,” even though plenty of editing effort went into creating that perfection.
From here on out, we’ll go through the remaining filters in alphabetical order, starting with Aden.
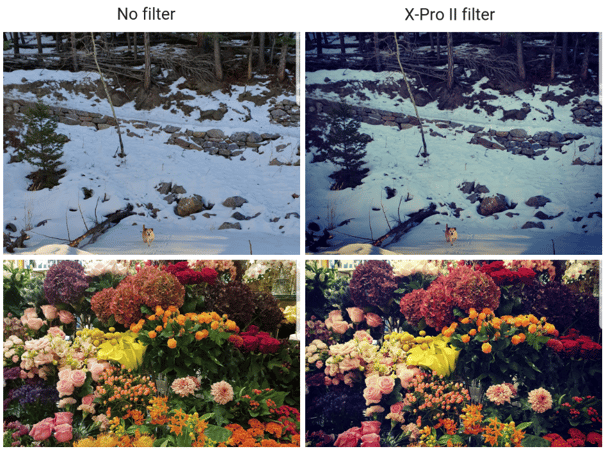
The column on the left shows two original images with no filter. On the right, you can see the application of the Aden filter.
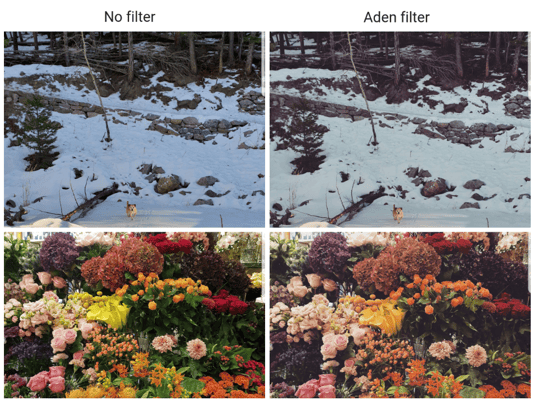
Aden gives a retro pastel tone to images. Both images on the right have a softer feel; the flowers are toned down. In the middle of the flowers, you’ll see some bright yellow lilies – notice how they aren’t quite as bright on the right.
The vibrancy is taken out of bold colors. The Aden filter gives a vintage feel by giving the image some desaturation. Warm colors are cooled down and harsh lights are softened with this filter.
The Aden filter is good for fall pictures, images with a lens flare, and portraits – thanks to its skin-smoothing effect.
| Related: Try your hand at photography and learn how to use portrait mode on the iPhone. |
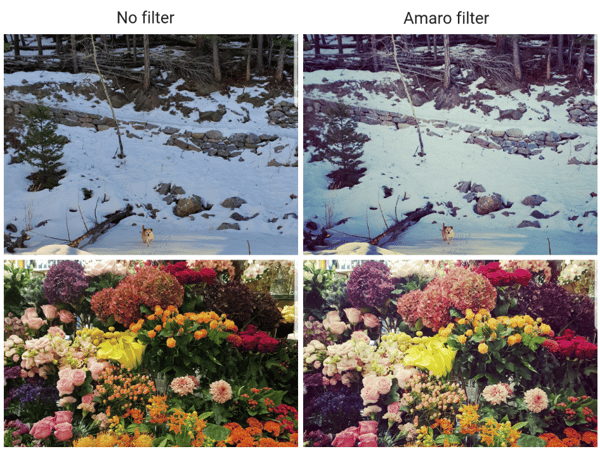
The Amaro filter brightens the middle part of your pictures. You can see this in the pictures in the top row; notice how much brighter the snow is on the right, especially in the center of the picture.
Amaro gives the effect of an aged picture with an airy feel and vintage glow.
This filter is good for selfies (especially for those with blue eyes), fall pictures, street art, and generally lightening up dark pictures.
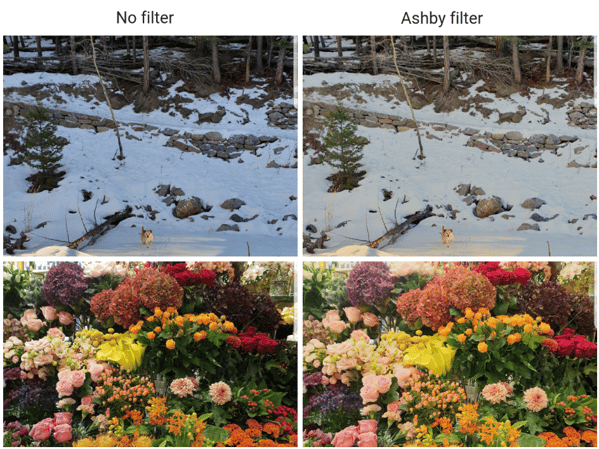
Ashby is another Instagram filter with a vintage feel. Look at the snow picture on the right: It has a soft golden glow, reminiscent of an old photo you’d find at an antique store. The stones appear brighter and more pronounced.
Unlike Rise and Sierra, Ashby gives that aged photo ambiance without increasing shadows. As a result, the filter is far from overpowering.
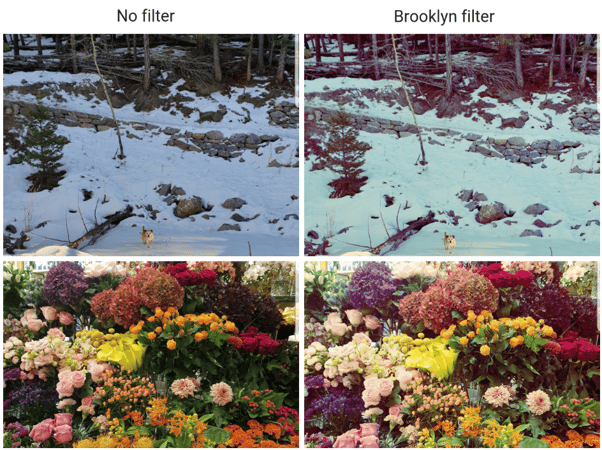
The Brooklyn Instagram filter is popular for nature pictures and receives an average of 87 likes per nature post.
It is inspired by New York (hence the name!) and saturates the picture with warmth. In the right image, notice the shadows on that snow-covered ice are much less pronounced.
As shown in the data above, Clarendon is without a doubt the most popular filter on Instagram. It is considered the ultimate all-purpose filter. Why, you ask?
Kirsten Agnello-Dean, social media strategist and creative copywriter, explains, “Clarendon tends to be a universal favorite, as it amps up the contrast and has a cool look.”
Take a look at these side-by-side pictures showing the application of Clarendon:
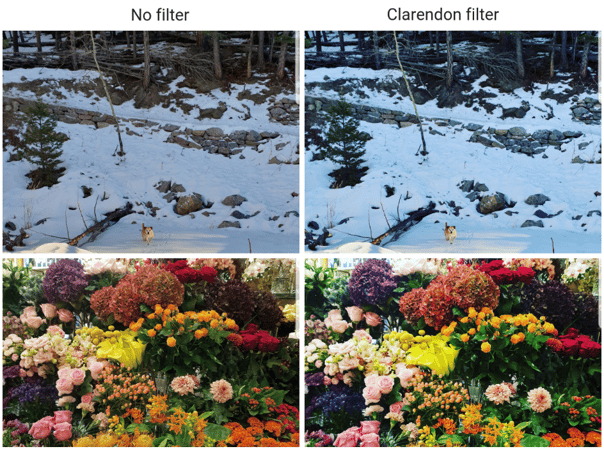
Notice how, in the snowy picture, the rocks that make up the wall appear more defined and the shadows on the ice are intensified. In the same way, the flowers pop – the vibrancy is heightened.
Overall, Clarendon increases saturation and contrast, making photos vivid and beautiful with a slight cyan tint in the highlight areas.
Clarendon is great for portraits, as the effect is natural; people look truly effortless. Clarendon is also a great filter for sunsets.
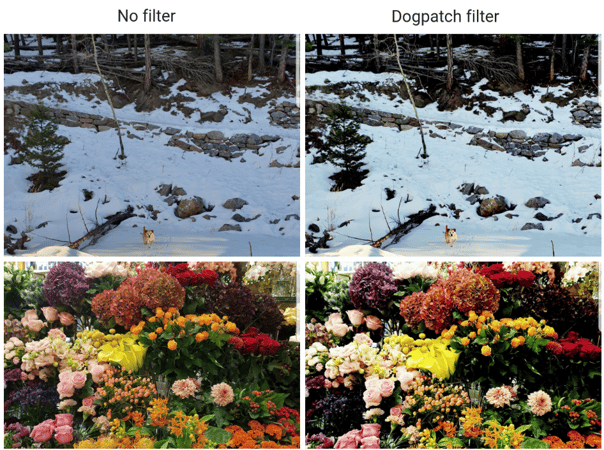
Dogpatch is an Instagram filter designed for bright images. It increases contrast while washing out lighter colors, giving your image an overall darker feel. This is why it’s not the best for already dark pictures, such as that nighttime skyline.
Dogpatch is best to use for light images that need an added boost of contrast and drama.
Like the rise of the morning sun, Earlybird is a filter designed to give your Instagram posts an aged feel with an old-school romantic mood.
Take a look at the two pictures on the right showing the Earlybird filter:
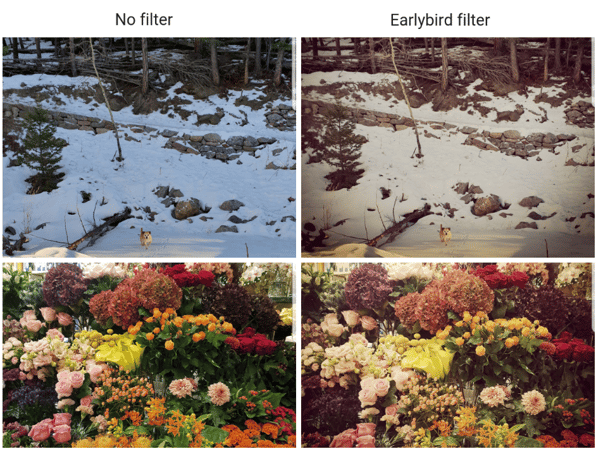
As you can see, the sepia tint gives the images a vintage vibe that can’t be ignored. (The browns in the snowy picture almost fool you into believing the picture was taken on film!)
Notice the vignette on both images, which darkens the edges. This draws your eyes to the center of the picture and allows your bright colors to shine through the faded feel.
Earlybird is a flattering filter; it gives your portraits a soft and warm glow while smoothing out skin tones. (Because we all know you totally woke up looking IG ready, right...?)
Like the gingham dresses worn by your grandmother, Gingham also has a vintage feel. Unlike Earlybird, there isn’t a vignette to fade out the edges.
Instead, highlights are reduced by almost 50 percent across the entire picture, while saturation is reduced by approximately one-third.
Notice how, in the picture below, all of the flowers have gone down a notch, appearing slightly faded. In the same way, the dog (who happens to be my fur baby Bella) blends in more with the snow.
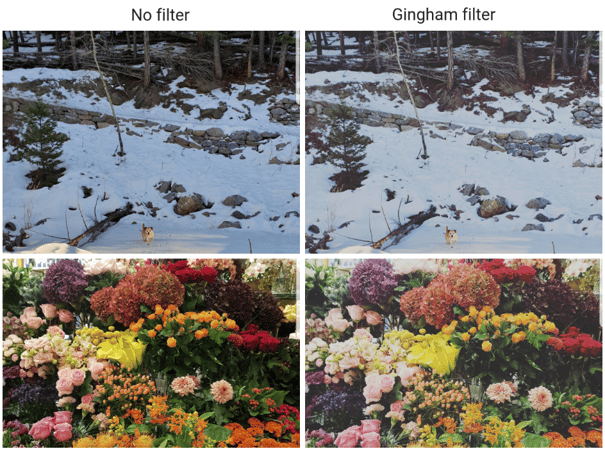
By taking some of the color out of the picture, your bright images will have more exposure, while darker photos will have a slight yellow tint.
The subtle warmth Gingham adds to your photos gives that vintage feel by washing out your pictures, giving a nostalgic impression.
Helena is an Instagram filter that adds warmth with a small amount of orange.
Take a look at the snowy picture with the Helena filter located in the top right:
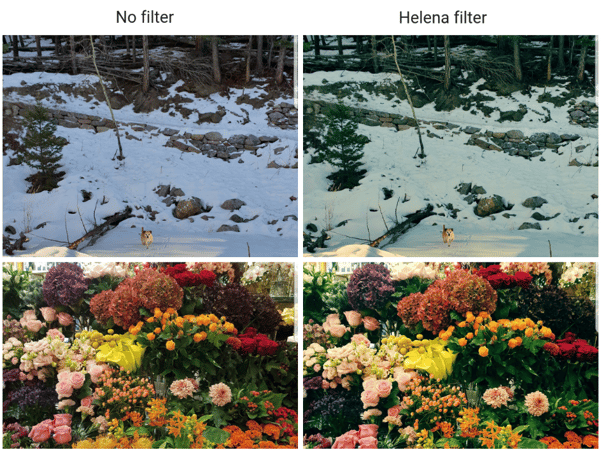
In the bottom left corner of that photo, notice how your eye is drawn to the small pile of snow. The contrast in color and temperature, along with that bit of orange tint, draws your eye to the patch of light on the snow.
In the same way, your eye is drawn to the warm-colored flowers in the bottom-right picture.
The warmth of Helena makes it a good filter for portraits and outdoor pictures.

Hudson is a filter known for making pictures look colder, just like taking a January plunge into the Hudson River.
The icy look brings out blues – so much so that the snow in the right column takes on a blueish/purplish feel:

In the bottom-right, the flowers appear more defined. The calm, sleek look of Hudson makes it a good filter for nature, cars, and architecture.
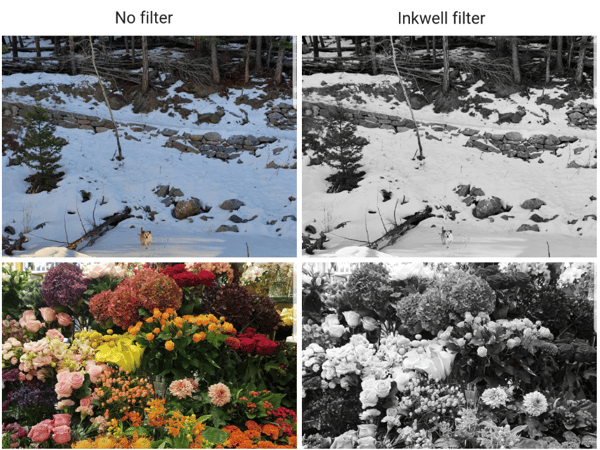
Like the little black dress hanging in every woman’s closet, Inkwell is Instagram’s basic black and white filter. The Inkwell filter increases contrast and gives your images an old-school vintage feel.
While it can be good for outdoor and nature shots, as you can see in the bottom-right image, you just might not want to use it on full-color flower pictures!
When I want to pump up my Insta-pics, Juno is one of my favorite filters.
Juno is a general-purpose filter that brings out warm colors, increases contrast, and gives a glow to bright areas of your pictures.
While reds, oranges, and yellows are intensified, blues and greens get a cooler tint – making the warm colors stand out even more.
In the bottom-right image, you can see just how much those red rose petals stand out thanks to Juno:
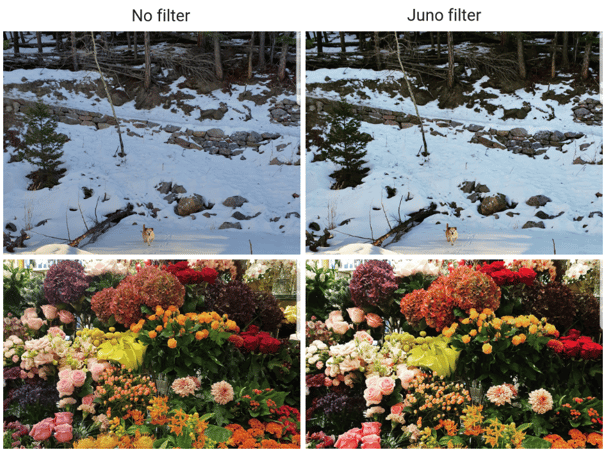
The emphasis on those sunset tones makes Juno a perfect filter choice for fall.
Earlier, we covered that Kelvin is the most likely to get you likes on your fashion posts, which is a little bit ironic – considering that many people don’t consider Kelvin to be flattering.
In its previous life, Kelvin was known as “Lord Kelvin” and created a super-saturated image with a strong sepia effect. In the latest and greatest 2.0 version of Kelvin, you’ll find a filter that adds warmth and saturation.
Kelvin is known for adding a golden tone and boosting Mother Nature’s basic shades of browns, greens, and oranges – as you can see in the top right photo here:
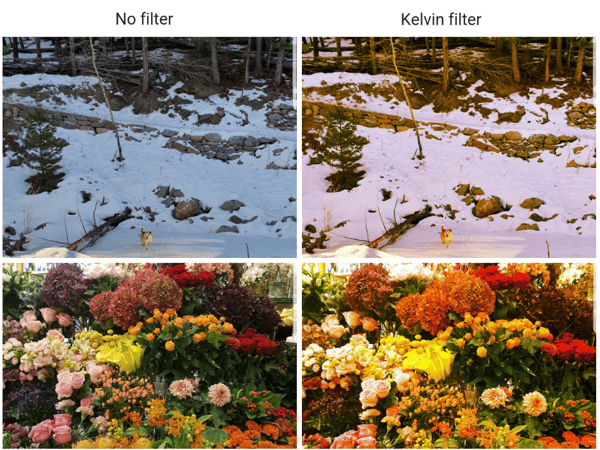
Thanks to Kelvin’s golden glow, warmer tones are intensified and brightened, In the bottom right picture, you can see the purple and mauve flowers have changed drastically.
Kelvin is good for images that have a lot of light, including landscapes and cityscapes.
Some filters are designed to pump up the vibrancy on your Instagram posts. Lark is known for doing the opposite, as it decreases the saturation on shades of red.
Take a look at the pale-pink roses in the bottom-left picture:
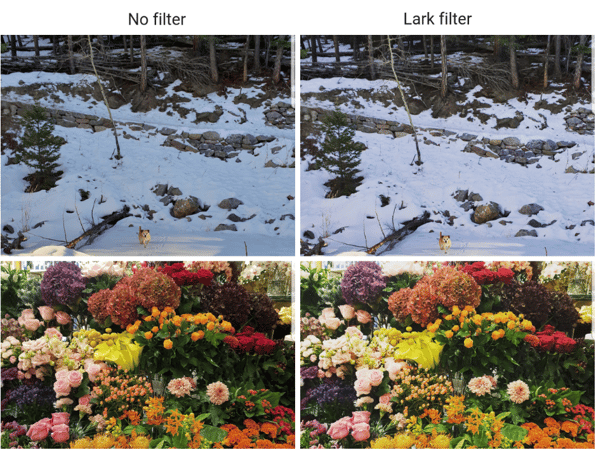
On the right, you’ll notice how much of that pale pink shade is gone, making the flowers close to cream.
While the saturation of reds go down with Lark, cool tones, such as blues and greens, have their saturation increased.
Overall, pictures are calmed down with a cool atmosphere. In the top-right image, you can see how Lark adds depth and brightens the picture.
Lark is a filter good for food, outdoor landscapes, portraits, or any picture you want to add a bit of brightness to.
The Lo-Fi filter is another one of my favorites.
While not the most natural, Lo-Fi increases saturation and adds shadows.
Check out the shadows on the ice in the top right image. Thanks to Lo-Fi, those shadows are much more prominent, and gives the sunlight peeking through the trees onto the ice a nice contrast.
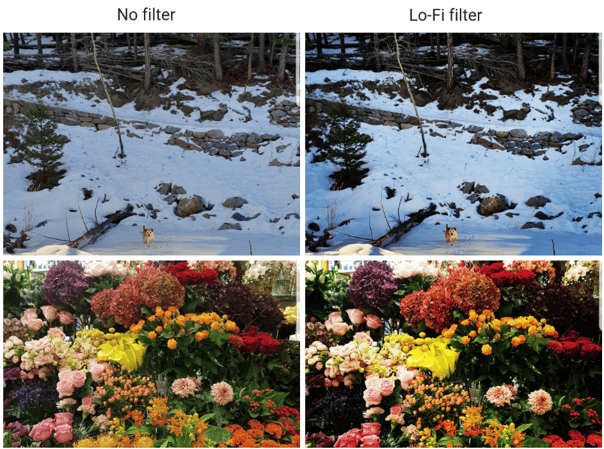
Lo-Fi is known for making pictures stand out. Thanks to those deeper shadows, the leaves in the bottom right fade into the darkness, giving the colorful petals more pop and power.
It is advised to use Lo-Fi with caution when it comes to selfies, but you be the judge. If you take a selfie with a Lo-Fi filter you love, go for it and publish that post!
Lo-Fi is an all-around good filter to add some drama to your Instagram posts, including food and nature.
The Ludwig filter is named after Ludwig Mies van der Rohe, an architect with the mantra, “less is more.”
In this filter, reds have an increased saturation while the saturation on other shades – such as yellow, greens, and blues – decreases.
This, combined with a slight decrease in contrast, gives a warmer, lighter look.
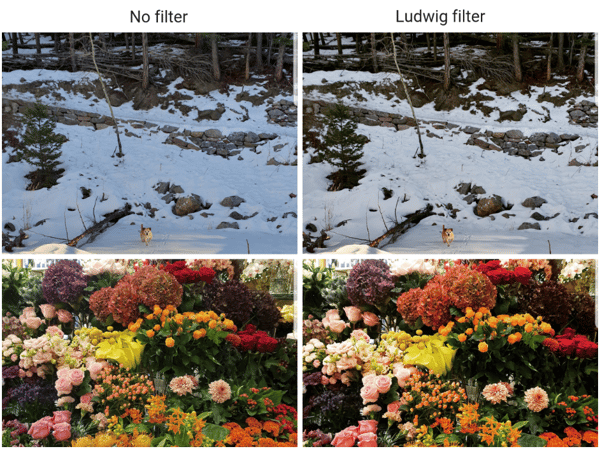
In the pictures above, you can see how there is an increased emphasis on both lights and shadows.
In honor of its founder, Ludwig is a great filter for architectural pictures and strong, geometric shapes.
Using the Mayfair filter is like shining a nice spotlight in the middle of your Instagram picture. This filter has a vignette on the corners of your image, making them darker than the center.
Comparing the snow in the two images here give a perfect example of the lightness in the middle of the image:
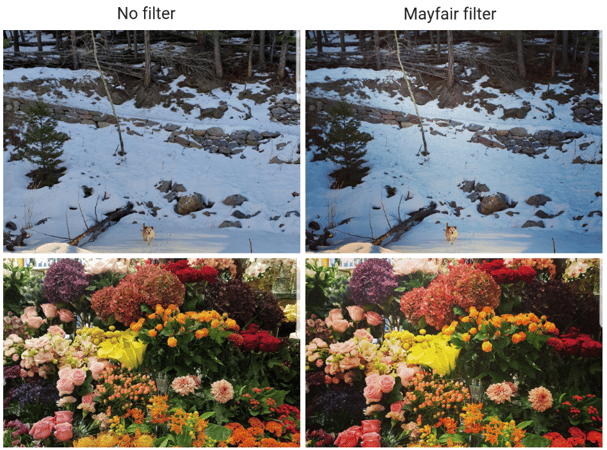
In general, the colors of the photo are warmer, as shown by the flowers.
Mayfair is a popular filter, thanks to its reputation as a flattering choice for portraits. It’s also a great filter choice for pictures that are underexposed or too bright.
Some describe Nashville as having a creamsicle color, others say it adds soft purples and pinks to your pictures. Whichever pastel shades you see, this is a filter with a retro and romantic aura.
The retro vibe comes from the ever-so-slight browning of the image, making it feel aged and overexposed in a very deliberate way.
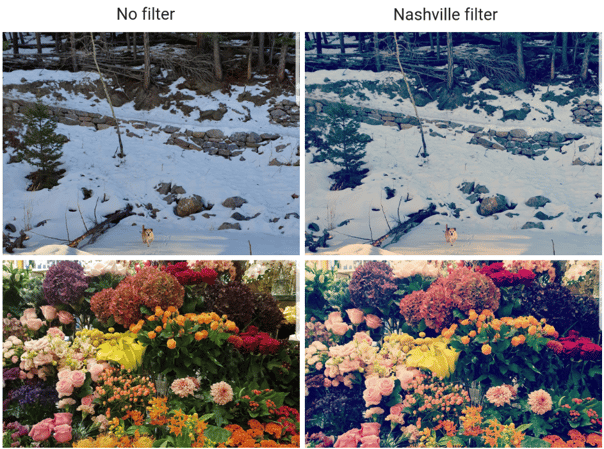
You can see the aged touch on both pictures in the right column above; the colors don’t pop as much, but the pictures maintain a warm feeling.
Reyes is a filter that desaturates and brightens images. It gives an old-time feel, but without the brown tint found in other retro filters.
As you can see in the bottom-right, while Reyes adds plenty of brightness, it takes down contrast and saturation.
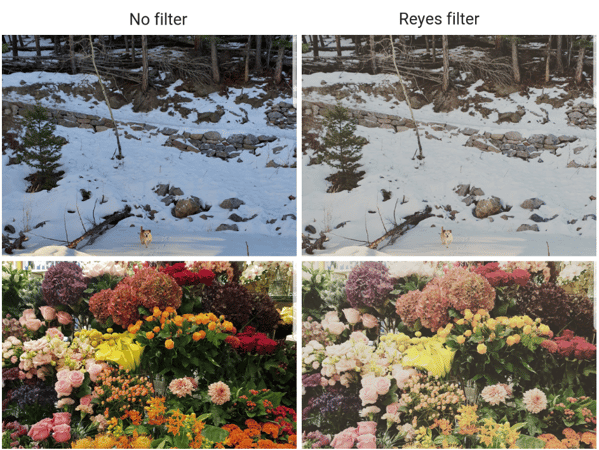
Some people love Reyes for selfies. iIt’s great for hiding blemishes and smoothing out skin imperfections, which takes away the need for other retouching apps. As a pale person, I do, however, advise using this filter with caution –– it’s not for everyone!
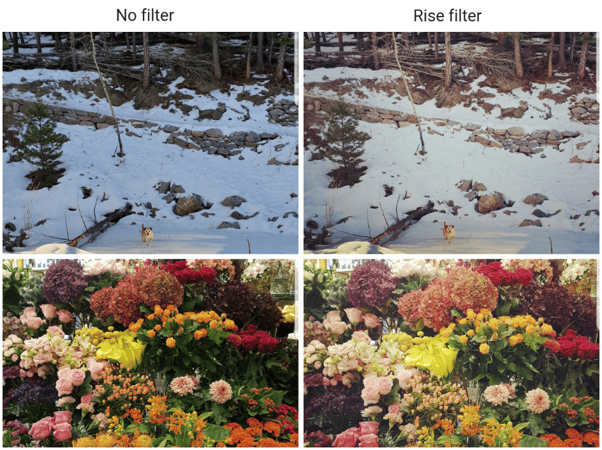
The Rise filter is meant to invoke the same sensation of the rising morning sun. It adds brightness, but in a faded, subtle way. (It is the morning, after all. You don’t want anything too bright!)
This filter was named after its creator, Cole Rise, and is good for smoothing out skin, landscapes and nature, or any pictures you want to give that happy-family feeling.
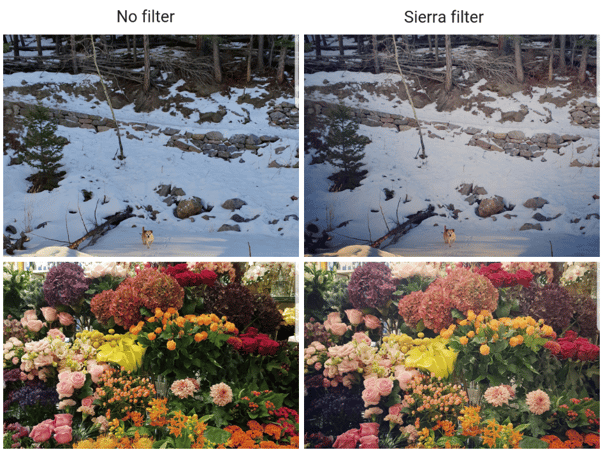
Like Rise, Sierra adds brightness while, at the same time, washing out the photo, giving it a subtle glow. This glow gets an extra boost – thanks to the vignette feature darkening the edges, drawing your eye to any colors in the middle of the photo.
Sierra is a sophisticated filter that brings out details and brightens pictures that are too dark. Some consider it a hipster filter, and it is great to use on pictures of nature, food, and singular objects.
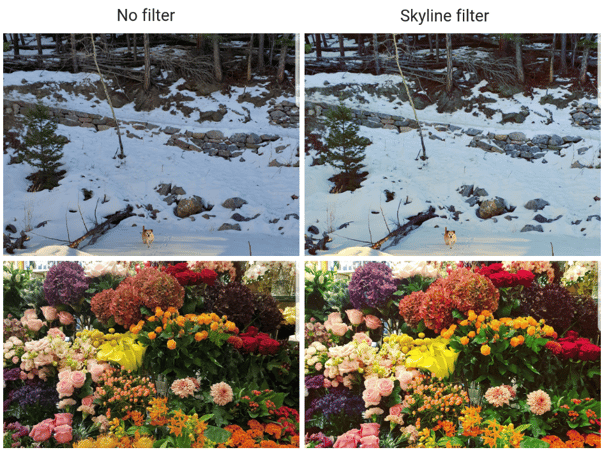
Given the bright lights of city skylines, it makes sense that the Skyline filter gives photos intensified color and brightness. It gives a pop while brightening colors in pictures of nature and eyes in portraits.
Use Skyline when you want to make the colors in your photos shine in all their glory.
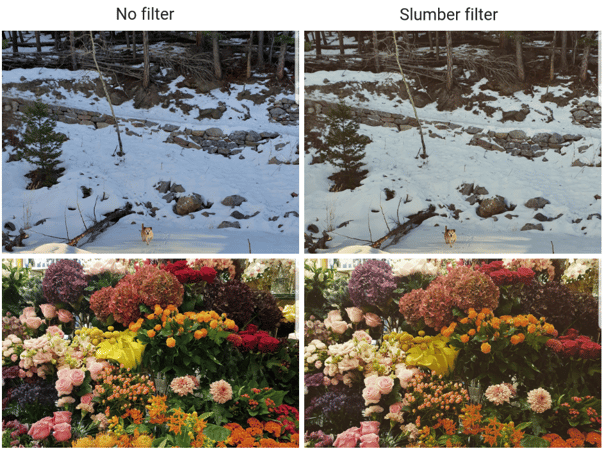
Slumber is another filter with an effect that matches its name.
Like a warm summer night gazing up at the stars, Slumber gives pictures a dreamy and romantic feel. Pictures are softened and colors are desaturated, covering images with a soft haze.
Use the Slumber filter for street photography, nature, or when you want an aura of vintage romance.
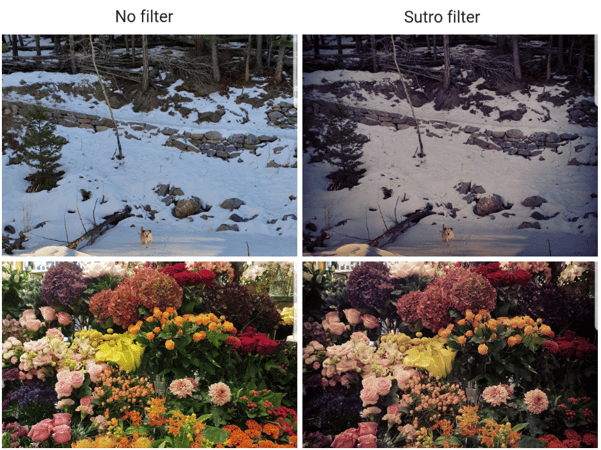
Sutro carries a strong vignette that dramatically darkens images. It emphasizes the purples and browns in pictures, giving a gothic tone that (aside from Halloween) isn’t the best for portraits. This smokey filter creates a sepia effect and desaturates your pictures, giving nature photos a mysterious aura.
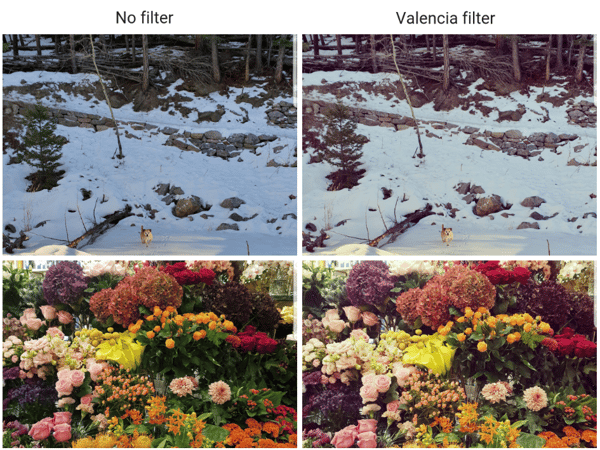
If the colors in your Instagram post are feeling a bit dull and drab, it’s time to give Valencia a try. This filter increases exposure, brightening your pictures and giving them warmth with a subtle yellow tint. That yellow tone gives your pictures the look of daylight, and, as a result, makes skin look better in portraits. (In fact, one study even found that healthy people use the Valencia filter on their Instagram posts!)
In addition to pictures of people, Valencia is a good filter for pictures with pastels, nature pictures, architecture, and skylines.
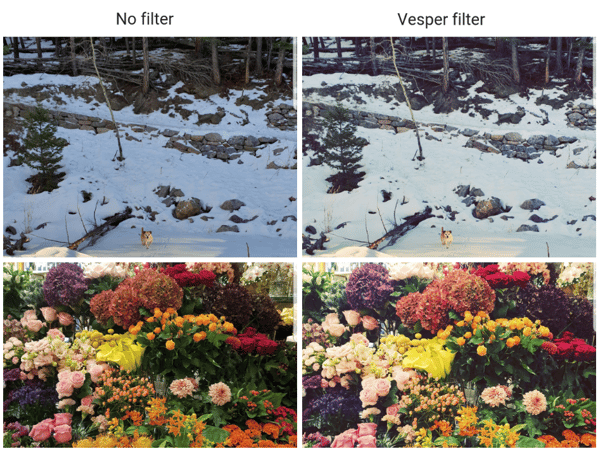
Vesper brightens your photos while substantially diminishing any darkness, as seen in the example below.
Like Valencia, Vesper has a slight yellow tint, giving that vintage feel. It smooths out skin and is great for portrait shots.
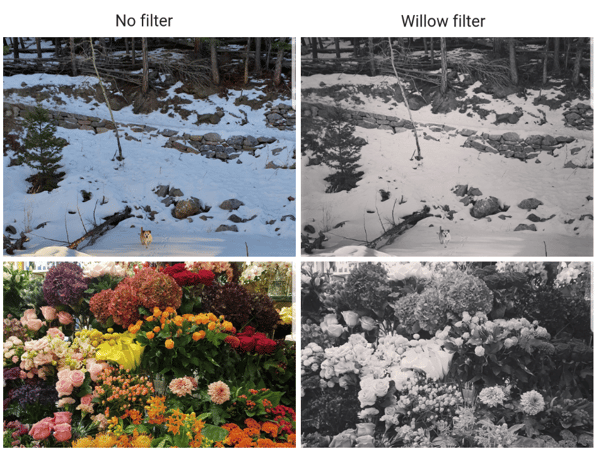
Willow is Instagram’s second of the two black-and-white filters. Inkwell, the first, is a more standard black-and-white filter, while Willow gives your images a softer, prettier feel.
The gentle white glow makes Willow good for portrait style pictures, as it hides flaws. The filter is also good for nature pictures, beach scenes, and architecture posts.
X-Pro II is the Instagram filter with the highest contrast. One of the most noticeable aspects of this filter is the vignette, which darkens the edges while the colors in the center become warmer.
This is one of Instagram’s oldest filters that adds both saturation and contrast, resulting in intense colors and shadows in the darker parts of your photo.
The X-Pro II filter is good to use on images that are bright, especially those with blues and reds. While not always ideal for selfies, it’s a great option when capturing wide views of nature or skylines.
Now that you know what these Instagram filters look like, if you don’t know how to add an Instagram filter, here are your instructions, complete with images to guide you.
|
TIP: From Facebook and Instagram to LinkedIn and Twitter, there are plenty of social media platforms to choose from. Which is best for your marketing strategy? Get insights from other users and find the best social network for your brand.
|
Adding filters is simple – it only takes a few extra seconds when creating your Instagram post.
Here’s a quick overview of the process, then I’ll walk you through it with step-by-step pictures.
Not sure the meaning of those steps? Below you can see them with pictures.
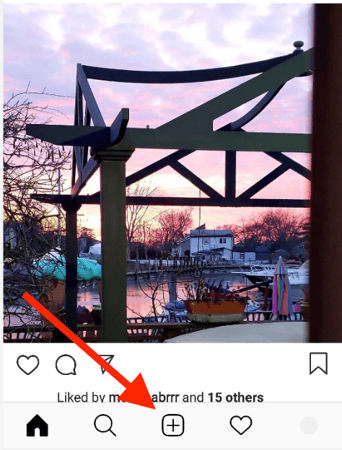
From your Instagram feed, tap the “+” button:
“Gallery” will automatically be selected at the bottom of your screen. Scroll down to find and upload any picture you have taken.
Alternatively, you can tap “camera” to take a picture or “video” to take a video:

After you have selected or taken your picture, you can resize or move it.
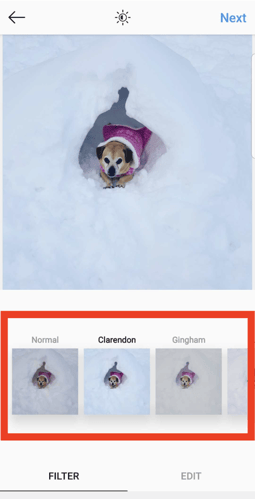
Once you’ve selected your photo, and you’re happy with its size, tap “next” in the upper-right corner.
Now it’s time to pick your filter. You’ll see them all at the bottom of your screen.
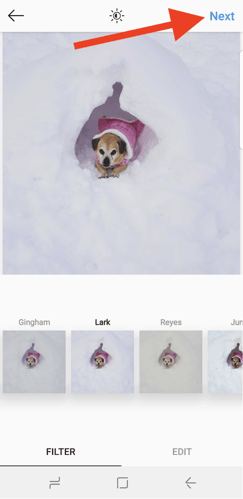
After you’ve chosen your filter, tap the “next” button in the upper-right corner.
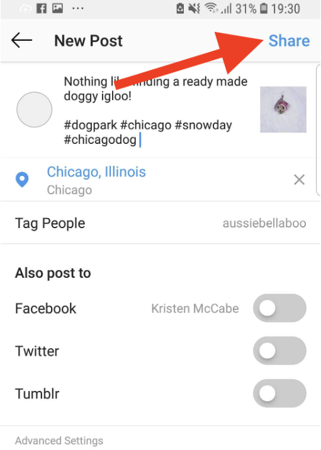
After that, you can tag someone in your Instagram post, add a location, your caption, and any Instagram hashtags. Once you’ve added any of those details, tap the “Share” button in the upper-right corner to publish your post.
Congratulations! You now know how to use filters when you post on Instagram!
With so many filters to pick from, you may find yourself wondering, “How do I know which social media filter to use?”
As our social media expert Kirsten Agnello-Dean explains, “The best Instagram accounts have a consistent look and feel. So, I always recommend keeping the filters you use limited to one favorite and not more than two-to-three in one account. My preferred technique is to tone photos myself so they always have the same levels of brightness, contrast, and sharpness. Just click edit (next to the filters tab) when you're uploading, and you can play with the sliders to your heart's content.”
I’ll show you how to create these custom edits later in this post.
First, take a look at one of the accounts Kirsten runs for Artisan Talent:

The consistent use of colors and filters lead to a cohesive look. There are plenty of apps and tools to assist you in creating the perfect Instagram grid with your filter of choice.
If you don’t need that custom-branded look for your Instagram account, feel free to choose your filter based on each individual post.
You don’t have to be a graphic designer, and there is no science: Choose what you like, and trust your gut! Add a vignette around the edge to draw attention to the center, saturate your image with more color, or go for an artsy black-and-white vibe.
I often find the filter I use depends on the lighting when I take my photo.
Download The Beginner's Guide to Instagram and get started 🚀
As Kirsten mentioned, you don’t have to use the filters created by Instagram. You can use effects to edit your post and, essentially, create your own custom filter. (Note, these edits can’t be saved for future photos; you have to make any manual edits to your photo’s appearance with each post.)
The adjustments available through Instagram effects are the same results you’ll find in filters, but more personalized for your specific liking per photo, such as:
I love bright colors, so I often increase saturation and contrast. These effects can be applied directly to your image or after you’ve chosen a filter. In total, there are 13 effects you can experiment with.
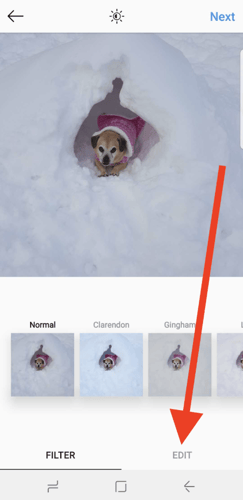
To apply effects to your posts, begin by following the above steps to create an Instagram post. When you reach the screen with filter options, tap the “edit” button:
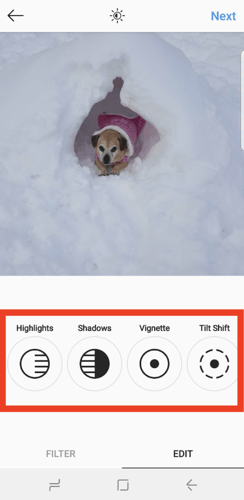
All of the Instagram effects will show at the bottom of the screen. Scroll through them and tap on the effect you want to adjust.
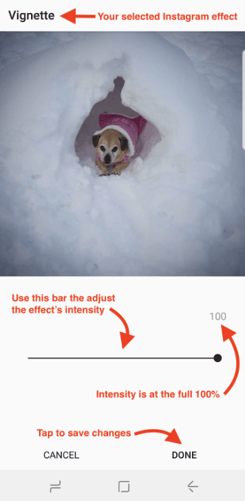
In this example, I’ll be using the vignette feature, which adds shadows.
After you tap on an effect, a bar will appear. Slide your finger up and down along the bar to increase or decrease the intensity of the effect.
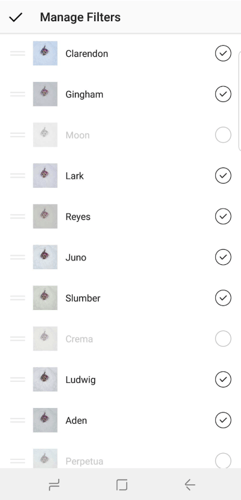
As you scroll through your Instagram filters, you may notice that some of them are missing; including filters from the top 29 shared here.
Don’t worry; they’re still there –I promise!
Here’s what the settings button looks like:
After you tap it, scroll through all 40 of the Instagram filters. Tap the button to add a tick to filters you want to use and untick any filters you don’t want displayed.
Filters aren’t just for Instagram posts – you can also use them on your Instagram stories. You can also grab some free instagram story templates to give the design of your stories a bit of a head start.
Here’s a list of filters you can use on your Instagram stories, named after famous cities throughout the world:
The following picture shows a side-by-side comparison of each of these pictures during the day; the first picture is the original photo:

Alternatively, here are what Instagram story filters look like when taken at night:
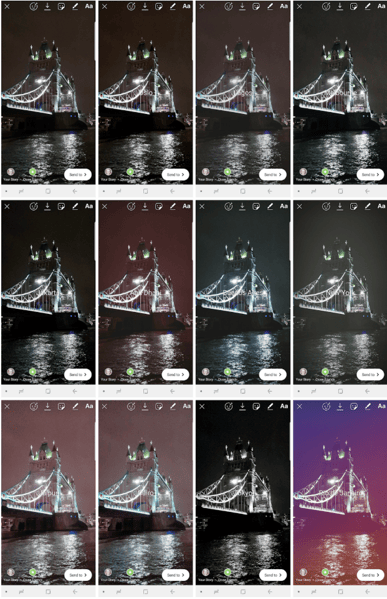
In both cases, you may notice that some of the effects are consistent across all lighting and times of day.
For example:
Many people love Snapchat for the fun lenses you can add; you know, all of those flower crowns and puppy dog ears with cute tongues sticking out. (Fun fact: This also applies to my two-year-old niece, who sees my phone and cries “Funny faces! I want funny faces!”)
Social media users who prefer Instagram have been left wondering, “Does Instagram have face filters?”
Yes, it does! Instagram currently has 49 face filters to choose from. Face filters on Instagram work on the face closest to the camera, and, depending on the angle, sometimes two faces. In comparison with Snapchat, Instagram filters don’t distort your face as much.
This is what that Instagram “face icon” looks like when capturing your story:
Once you’ve tapped on the face icon, take your time and have fun scrolling through all 50 filters at the bottom of the screen. Then, tap the white button in the bottom-center of the screen to capture your image.
This video shows these steps put all together:
The filters in this video, however, may no longer be available, as Instagram updates its face filters over time.
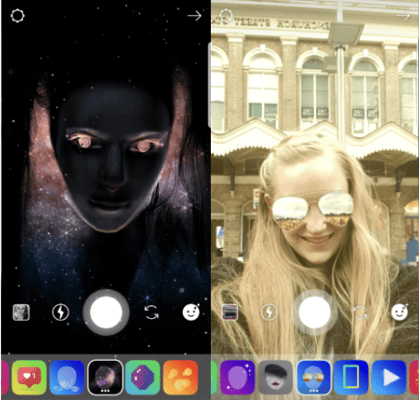
From animal ears to glam glitter eyeshadow, and everything in between, here are just two of the current face filters available:
Now that you know how to use Instagram filters, it’s time to put them to use. Whether you’re running a business account that needs to feel on-brand, or you just want to have some fun with your friends, you can spend endless time experimenting with filters and effects.
Here’s a quick summary of the points we’ve discussed:
If you use Instagram to build your brand, share your Instagram marketing tips, tricks, and feedback with others. Your peers will thank you!


Gone are the days when you can share just one picture in an Instagram post. Now, not only can...
by Kristen McCabe

As a designer, you spend most of your time worrying about other people’s brands.
 by Dawson Whitfield