Interested in learning how to take professional-looking photos with your phone?
Whether you’re taking family pictures that will last a lifetime or you want to step up your Instagram game, use portrait mode to achieve shots that look similar to those taken with a DSLR camera.
What is portrait mode?
Portrait mode is a camera setting that creates a depth-of-field effect by keeping subjects in focus and blurring the background. It creates the bokeh effect, which makes the subject stand out and gives photos a professional look.
Apple dubbed the feature “portrait mode” in 2016 with the release of iOS 10.1. In photography, this depth effect is called bokeh.
Which iPhones have portrait mode?
- iPhone 7 Plus
- iPhone 8 Plus
- iPhone X
- iPhone XS
- iPhone XR
- iPhone XS Max
Portrait mode is only available on iPhones that have a dual-camera. A large aperture makes the background out of focus by using a narrow depth of field. This option allows end users to use other emerging technologies, such as posting 3D photos on Facebook.
Androids also have portrait mode, or a version of it. Some of these phones even offer similar effects for selfies.
How to use portrait mode
You can use portrait mode natively on iPhones and Android devices. Plus, with third-party apps, you can create images that have a similar bokeh effect.
iPhone portrait mode
- Open the camera app.
- Swipe through the various effects along the bottom above the shutter button and select “Portrait.”
- Using portrait mode, your iPhone’s camera will automatically focus on your subject in the foreground.
- Aim your camera at your subject. It must be within two to eight feet from your phone. If you aren’t within these parameters, you will get “move further away” and “move closer” prompts accordingly.
- When portrait mode is in effect, a yellow box will appear on the screen. For iPhone 8 Plus and newer models, the box will read “natural light.” For the iPhone 7 Plus, “depth effect” will appear in the yellow box.
- If you see the “natural light” box, you can adjust lighting as necessary. Swipe through additional options such as studio light, contour light, stage light, and stage light mono.
- Snap your picture by pressing the shutter button.

I used an iPhone 7 Plus to capture this moment with my dog, Wrigley. Notice how she’s crisply outlined, down to the individual hairs on her ears.
On later iPhone models, you can continue to adjust a portrait mode photo after you’ve taken it. Click “edit” to change the amount of background blur and add studio lighting effects. You can also remove the portrait mode effect from the photo altogether.
Portrait mode for Android
The various devices have different interfaces, but here are the general instructions for using portrait mode on Android.
- Open the camera app.
- Select the menu button or swipe to choose the portrait option.
- Point your phone at the subject and take a picture with the shutter button.
- With some models, the blur is applied after the photo is taken.

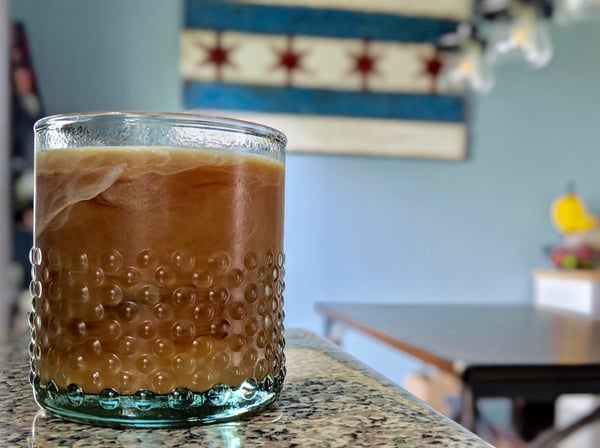
My brother used a Google Pixel 3 to get this shot – the foreground is so clear you can even see the distinction between cream and coffee.
In portrait mode, the Google Pixel 3 takes a photo with a blurred background and plus saves an original version. You can also make a few tweaks to the shot with the “edit” option, including adjusting the depth, level of blur, and focal point.
Portrait mode apps
If you have an older model phone, you can create photos that look just like portrait mode. It just requires a bit more editing in third-party apps.
This free app allows you to mask out a subject to feature and blur the background of any photo. It’s not an exact science, but it works well for big, bulky objects. You can change the brush size as well as the level of blur to apply.
This paid app offers a few additional options, like facial recognition to automatically blur the background behind an identified face. It’s more complicated than other options, but it does offer the best features to create portrait mode-like pictures.
Portrait mode tips
These general photography tips will take your portrait mode photos to the next level.
Distance matters
The larger the distance between your subject and your intended background, the better your photos will turn out. If your subject is up against a brick wall, it will hardly be blurred out in portrait mode because the camera will struggle to focus.
Stay still
Of course, you as the photographer should try to be still. But for the best shots, your subject should also try to stand still for the clearest images.
Check the background
Make sure that your background is free of distractions, like bright-colored objects. The phone’s camera can get confused. On top of that, bright colors can pull focus, drawing the eye to the blurred mystery object.
Follow the light
Bright, natural light makes for the best photos, period. Light and its resulting shadows give the camera a better indication of what to blur and where. This creates crisp, clean pictures.
Use a filter
Great lighting isn’t always readily available, but that doesn’t mean you can’t get great shots. Create the illusion of light with filters. When coupled with portrait mode, filters can completely change and customize your image.
Say “technology”
Now you can take high-quality photos using only your phone! If you want to learn more about photography, check out the top photo editing software for 2019.

 by Bridget Poetker
 by Bridget Poetker
 by Bridget Poetker