
How to take a screenshot on (almost) any device
As soon as you begin taking screenshots, the lesson becomes apparent: They are a tool we can’t live without. Screenshots are designed to help in both business and personal life.
Maybe you want to share an image from the dashboard of your marketing software with your boss. Perhaps you are searching online for a gift, and you want to capture a few of the best ideas and have them saved in your gallery. Maybe you found an awesome infographic that provides inspiration for your own content marketing strategy. Or, perhaps you’ve just found a crazy cute puppy that you want to send to your friends.
Whatever the purpose, screenshots are there to improve your time management and communication.
It’s easy to learn how to take screenshots, but the process varies across devices. Even when you’re working with all Apple products the process can change!
Here you’ll find instructions on how to screenshot almost any device. Why do I say almost? As technology continues to change, so do the devices we can screenshot!
Rest assured though, in this article you’ll find instructions on how to screenshot any major device. (You know, phones, computers, and tablets – all the devices you spend your time staring at!)
Whether you are new to screenshots, or simply learning how to screenshot a new device, here is your guide to taking a screenshot on all major devices.
In general, you can take a screenshot with the press of a few simple buttons or by using a free app. Here’s your simple guide to which buttons to push to get the results you want. (And I’m speaking strictly about technology here, no need to push the buttons of your spouse or co-worker!)
In total, the ways you can learn to take a screenshot on this page include:
Feel free to scan through each method as you look for your device, or click on the list above and jump straight to what’s relevant for you.
If you need more information, you’ll find links to separate pages with detailed instructions on how to screenshot on Android, iPhones, Mac computers, and Windows for your PC computer.
With that, let’s get started with the first type of screenshot, using your Mac computer.
The most common way to take a screenshot on a Mac is by simultaneously pressing and holding down the Shift, Command, and 4 keys.
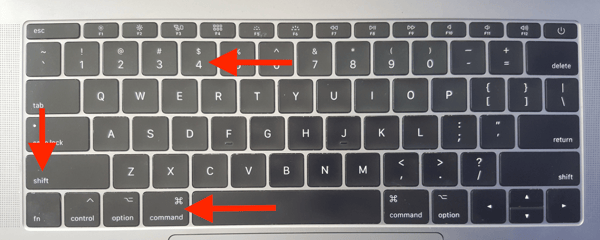
Once you are holding down these buttons, your mouse will turn into a crosshair, which looks like a circle with a plus sign in the middle of it. Click and drag your mouse to cover the area of your computer screen you would like to capture.
After you have done so, you’ll hear a clicking sound (similar to a camera shutter) and the screenshot will be saved to your desktop.
You’ll find the image file saved on your Apple’s desktop. The file name will automatically include the date and time you captured your image. It’s worth taking the time to rename your screenshots; this will make them easier to find in the future.
In addition, just like real paper, it’s a good idea to arrange your screenshots into folders. It’s amazing how little time it takes for your desktop to become flooded with screenshots, leaving you unable to find the files you need!
Another way to screenshot on a Mac is by holding the Shift, Command, and 3 keys. This option allows users to select sections of the screen they'd like to screenshot instead of the entire screen.
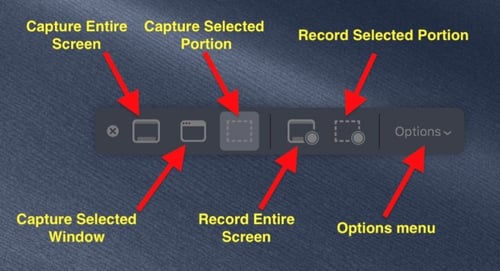
To open the Mac screen capture tool, hold the Shift, Command, and 5 keys. Once you’ve done so, a menu should appear that looks a little something like this:
Next, it's time to look at how all of you PC lovers can take a screenshot!
One of the most common ways to take a screenshot on Windows is using the Print Screen button, labeled “PrtScrn” in the top row of your keyboard.

This will capture your entire screen. It will be copied to your clipboard, enabling you to paste the screenshot in a clipboard, but it is not saved as an image.
To save images, you can use the Snipping Tool, which comes pre-installed on most PC computers.

The Snipping Tool enables you to capture a portion of your screen, name the file, and choose the destination to save your image. (Meaning, you can save your screenshot on your desktop, documents folder, image gallery, or any other folder.)
Click the button below for more information on how to take a Windows screenshot. You’ll find images and instructions to guide you in both the Snipping Tool and additional keyboard shortcuts, enabling you to capture a portion of your screen, an active window, and more.
If you're a PC user, there's a good chance you'll have an Android phone, too. If so get ready for the next device, where you'll learn how to screenshot your Android phone.
Taking a screenshot on an Android phone is done with the simple push of two buttons.
Which two buttons those are is determined by the Android phone you have. In general, there are two easy ways to screenshot your Android phone.
The first applies to Samsung Galaxy S7 and earlier versions of the Galaxy phone. The second applies to other Android phones, including models by Google, HP, LG, and the Samsung Galaxy 8 and later versions.
Let’s start with taking a Samsung Galaxy S7 screenshot.
Samsung continues to release updated versions of their Galaxy phone at a rapid pace. For many of us, keeping up with each release is simply not possible.
Or, even if you do have a newer phone, you could accidentally drop it on a frigid cold Chicago day, making your phone’s screen turn an inky purplish/black color that your phone never recovers from.
Yes, you guessed it: This was me a few months ago, making me the proud owner of my husband’s old Samsung Galaxy Note 5.
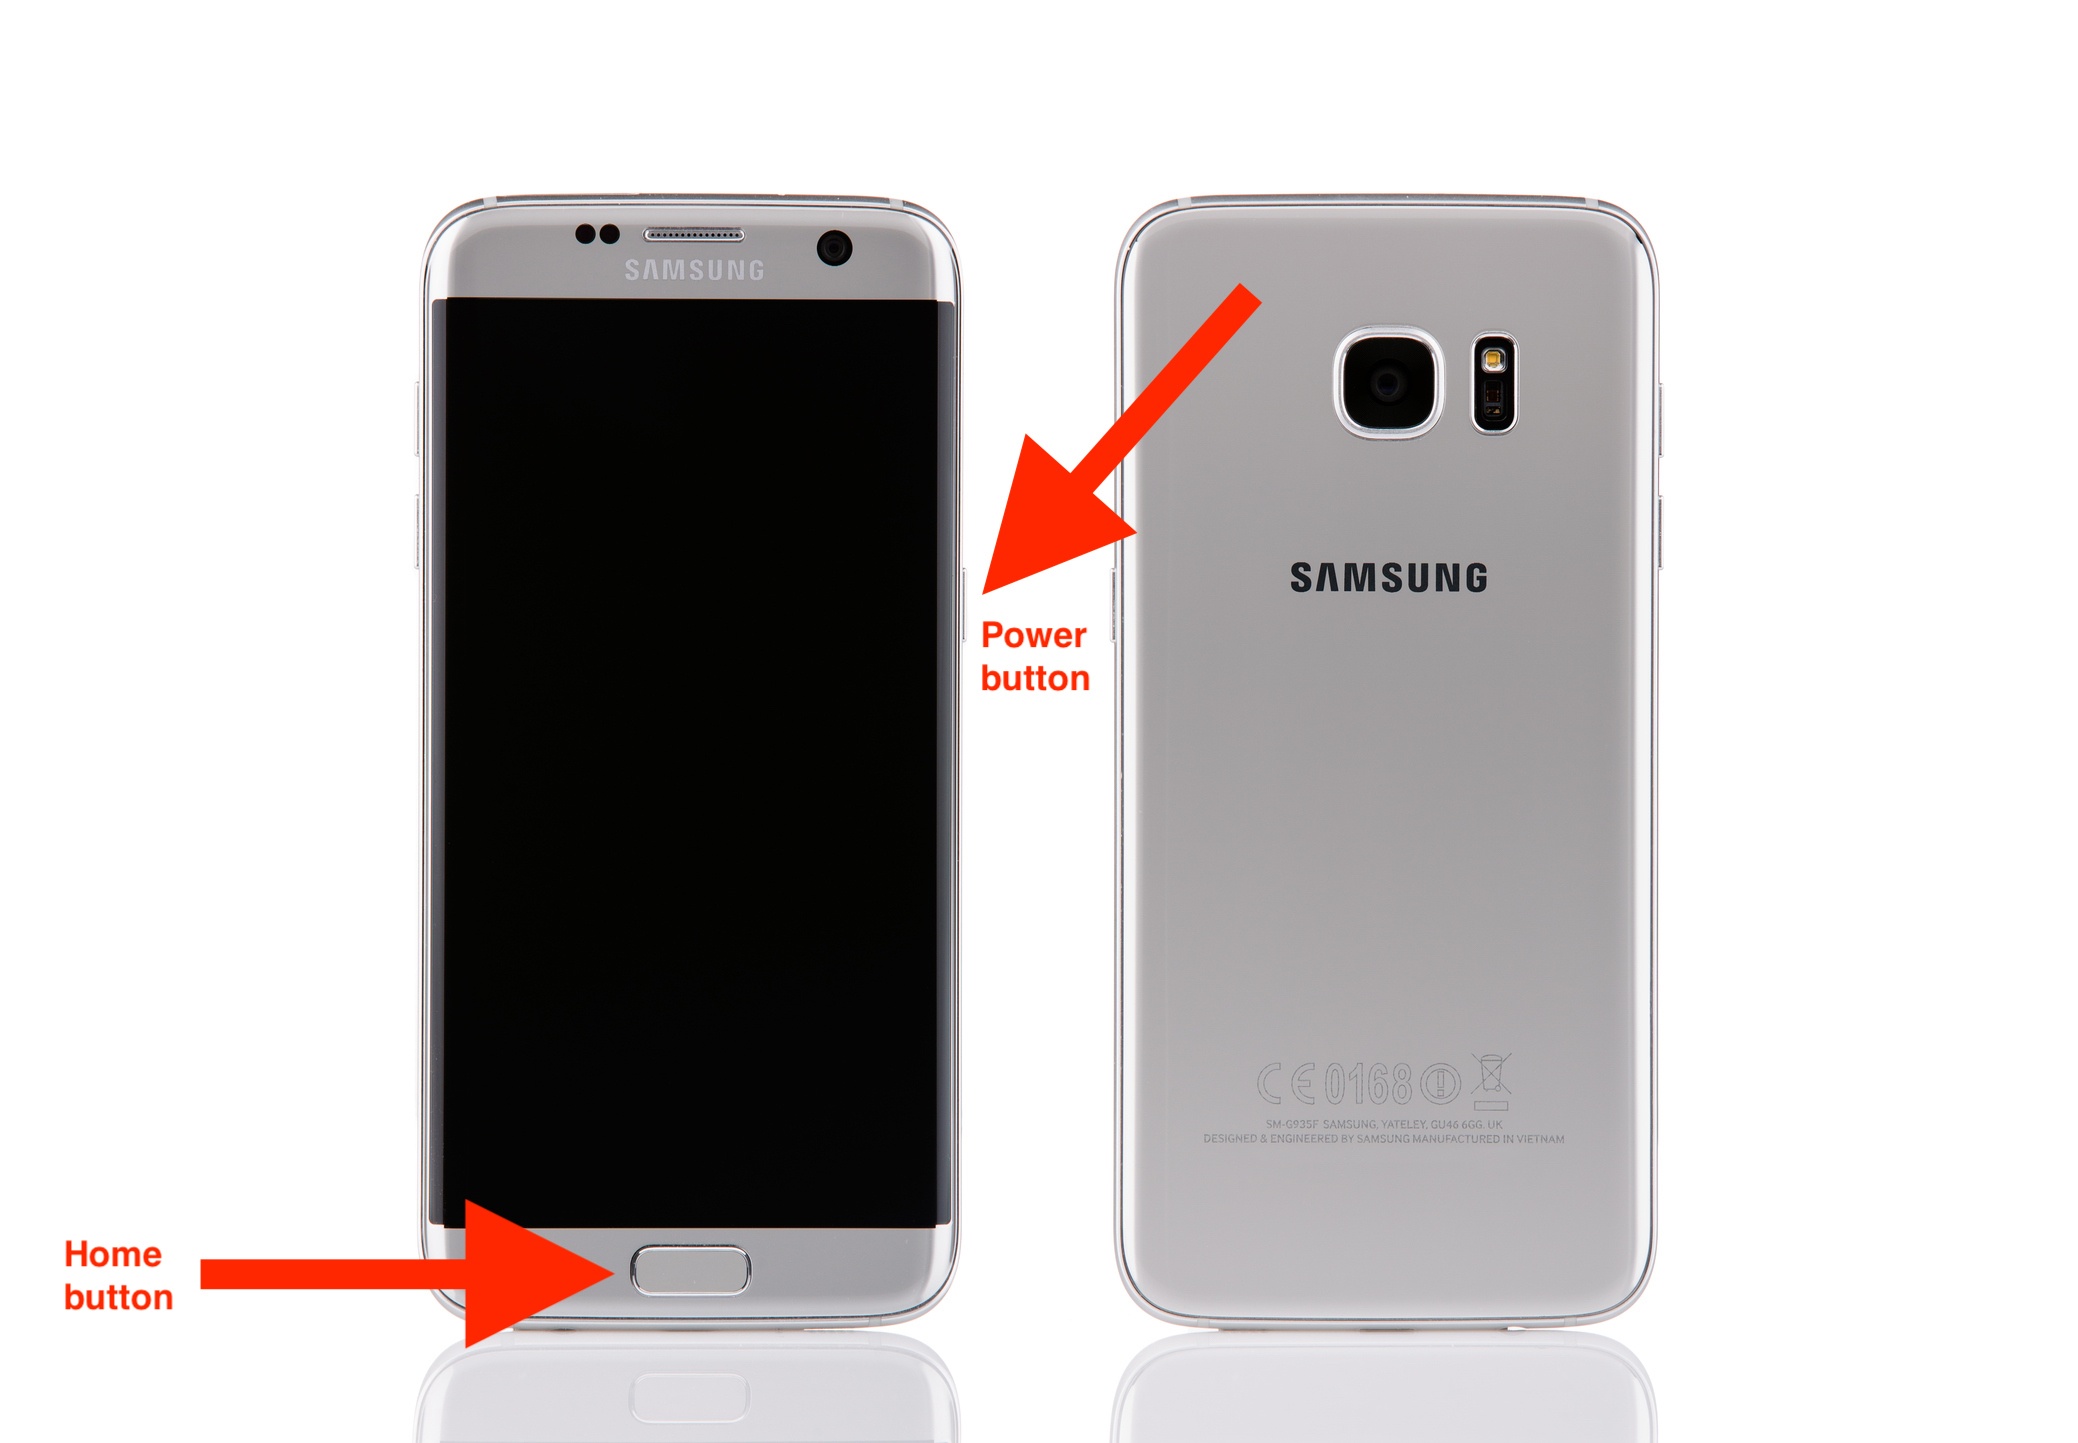
So, if you’re like me, and have the Samsung Galaxy S7 or earlier (which still works wonders for all your Smartphone needs) take a screenshot by pressing and holding down the Home and Power Buttons.
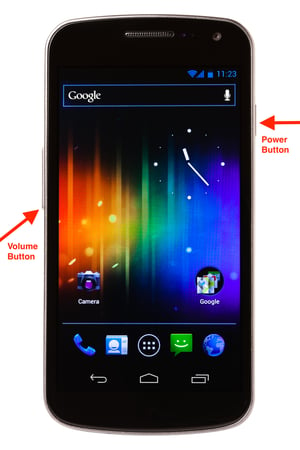
The majority of Android phones (especially those released in the last few years) enable you to take a screenshot by pressing and holding down the Power and Volume Down buttons.
This is also how you take a screenshot on the later versions of the Samsung Galaxy, beginning with the S8.
Your screen will briefly flash around the edges, and if the sound is on you’ll hear the sound of a camera shutter. This confirms your screenshot has been taken, even if it seems to disappear into the abyss.
Rest assured, you can find your screenshot in your phone’s gallery app.
After capturing your screenshot, many Android phones will give you options to edit and share your screenshot.
The placement of the volume down and power buttons varies based on which phone you have.
For more information on how to take a screenshot on Android, including details for the top six Android phones, free screenshot apps, and where those buttons are on various models, click the following link.
Like Android phones, iPhone screenshots are taken with the simple push of two buttons.
And, similar to the Samsung Galaxy, the buttons you push to capture your screen will vary based on which phone you have.
To screenshot with earlier versions of the iPhone (all the way up to the iPhone 8), simultaneously press and hold down both the Power and Home buttons.
If you are new to iPhones, this image will help. The arrow on the right is pointing to the power button, and the circle at the bottom of your iPhone is the home button.
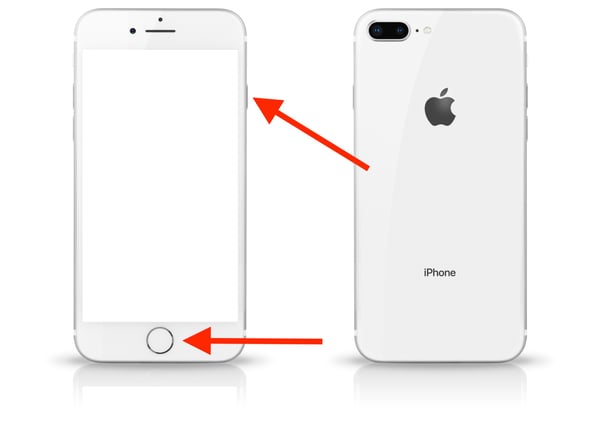
Your screen will flash for a moment, confirming your screenshot has been taken. If you have your phone’s volume on, you will also hear the sound of a camera shutter.
If your phone is running on iOS 10 or earlier, you’ll find your screenshot saved to your camera roll or in the All Photos album. If your phone runs on iOS 11, you’ll find the image within the screenshots album of your iPhone’s photo app.
If you’ve got a fancy new iPhone X, you’ll notice you don’t have the Home button on the front of your phone.
To take a screenshot on your iPhone X, simultaneously press and hold down the Side button (the large button on your phone’s right side), and the Volume Up button, found on the left side.
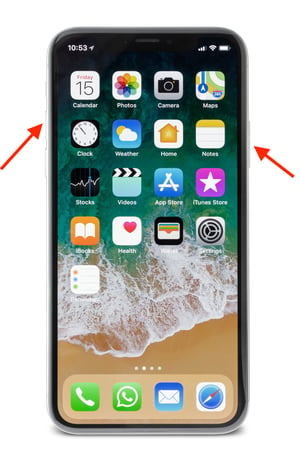
Like the iPhone 8, when you screenshot an iPhone X you will again see a brief white flash and hear the sound of a camera shutter, assuming your volume is on.
A thumbnail of the screenshot will then appear in the bottom-left corner of your phone’s screen. Tap on the image to edit your screenshot or choose where it will be saved.
How to screenshot on a Samsung tablet
If you have an Android phone (including a Samsung Galaxy 8 or later) taking a screenshot on a Samsung Galaxy tablet will be a very familiar process!
To capture your screenshot, press and hold down the Power and Volume Down buttons at the same time. You’ll see a white border flash on the edges of your screen.
Your screenshot will be saved to your tablet’s gallery and copied to the clipboard, making it easy to paste in an email or document.
If your Samsung tablet has a physical Home key, you won’t need to use the volume button. Instead, simultaneously press and hold the Power and Home buttons.
Taking a screenshot on a Windows tablet is similar to taking a screenshot on an Android phone.
Here are three sets of instructions to screenshot Windows tablets, including The Microsoft Surface 3, the Microsoft Surface Pro 4 and the Surface Book.
To take a screenshot of your Surface 3 tablet, simultaneously press and hold the Volume Down button and Windows logo.
You’ll find the windows logo at the front center of your device.
The screen will dim as the image is captured. You can then find your screenshot in the screenshots folder of the pictures library, under “This PC.”
Instead of the Windows logo, on a Surface Book or Surface Pro 4, take a screenshot by pressing and holding down the Power and Volume Down buttons at the same time.
Once again, you’ll find the images in a screenshots folder of your pictures library.
For a tablet running on Windows 10, you will find yourself with the same additional screenshot functions found on a Windows computer.
Just like your windows, laptop, you can take a screenshot with the Snipping Tool. This will enable you to capture a portion of your tablet’s screen and name the file.
If your Windows 10 Microsoft tablet has a keyboard with the Print Screen button, you can capture your screen by pressing and holding down the Windows icon and the Print Screen key.
Often, you’ll find the Print Screen button labeled with the letters PrtSc.
You’ll find these screenshots saved in the screenshots folder of your tablet’s pictures library.
To take a screenshot on your iPad, press and hold down the Sleep/Wake button, then tap the Home button.
You’ll find the Home button at the bottom center of your screen. The Sleep/Wake button (also known as the On/Off button) is shaped like an oval; it is located on the top of your iPad in the right corner.
By holding down the Sleep/Wake button first, then tapping the Home button second, you’ll be less likely to accidentally activate Siri.
After you hold down both buttons, your iPad screen will flash and you’ll hear the sound of a camera shutter. (If the volume is on, that is!)
You will find your screenshot image in the camera roll of the Apple photos app.
Kindle screenshots are easy to take if you have a third generation of the Kindle Fire.
Not sure which Kindle you have? If you bought your Kindle after 2012, you’ve got the third generation.
If this is the case, you can easily screenshot your Kindle with the physical buttons found on your device.
Like your standard Android phone or Samsung tablet, simultaneously press and hold down the Power and Volume down buttons.
You will see a quick animation (the screen will flash for a moment) and hear the camera shutter sound if the volume is on. You can find the screenshot in your Kindle’s photo app.
On the Kindle Fire 7, the fifth version of Amazon’s tablet, those buttons are both located on the top of your device.
Here you can see a video of the Kindle screenshot process:
If you have an older Kindle Fire tablet from 2011 to 2012, the process is a bit trickier. In this case, you’ll need to connect your tablet to your computer. To screenshot an original Kindle Fire, follow these instructions provided by the pros themselves at Amazon.
Now you’re a screenshot pro ready to capture images on any device.
Once you start using screenshots, you’ll see just how endless the possibilities for their use are!
Here’s a quick summary of how to take a screenshot on some of the most common devices we’ve discussed:
Whether you see a great gift idea you don’t want to forget, find an image to use as your phone’s wallpaper, or you find a social media post with an amazing tip you want to remember later, screenshots are there to help.
And, to get started, you can even practice your new skills by screenshotting this article!
Kristen’s is a former senior content marketing specialist at G2. Her global marketing experience extends from Australia to Chicago, with expertise in B2B and B2C industries. Specializing in content, conversions, and events, Kristen spends her time outside of work time acting, learning nature photography, and joining in the #instadog fun with her Pug/Jack Russell, Bella. (she/her/hers)
It’s safe to say there are more app stores than I realized...
 by Bridget Poetker
Ok, it’s official… Amazon does everything.
 by Bridget Poetker
It’s safe to say there are more app stores than I realized...
 by Bridget Poetker
Ok, it’s official… Amazon does everything.
 by Bridget Poetker
