Can you believe it’s only been eight years since Instagram introduced us to its unique filters and recognizably-square shaped photos?
That’s right!
Since its launch in 2010, social media users all over the world have continued to flock to the photo-sharing app. Personally, I’ve had my account since 2011. Over the past seven years, I’ve posted hundreds of life updates in the form of pictures and videos.
In high school and the early college days, I left my profile on public. That means that anybody using the Instagram app could come to my profile, see my posts, and follow me without needing my permission.
However, as I began my job search, I realized that maybe my potential employers didn’t need to see my post-wisdom teeth removal picture (can you say chipmunk cheeks?) or the half-dozen pictures from my various sorority formals.
It was definitely time to make my account private.
Are you in the same boat?
Maybe you’re starting your job hunt and want to hide some of the more questionable college days from potential employers.
Maybe you’re trying to hide your posts from that aunt in Georgia who you just know has been creeping on your Instagram account since you abandoned Facebook.
Whatever your reasoning may be, you’re ready to take your Instagram account private.
Luckily, it’s a super simple task!
In this quick guide, I’ll give step-by-step instructions (plus corresponding images) to show you how to switch your Instagram account to private. But first, let’s discuss what going private really means.
Public vs. private Instagram account
Read this before you make your Instagram account private! Depending on your objectives, you may realize that a public account may be the better option.
Private Instagram account
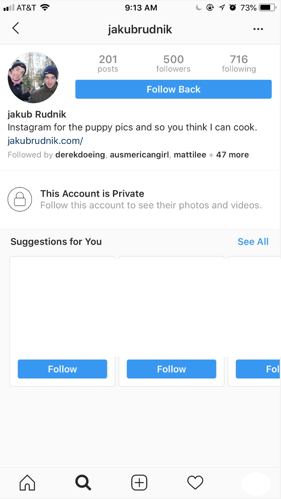
With a private Instagram account, users that land on your page will be able to see your profile picture, username, and bio. They can also see how many followers you have, how many people you follow, and how many posts you have. They won’t be able to see any of the actual posts.
If they want to follow you, they have to send you a request. However, your profile will look the same to them until you accept their follow request. Once you do, they’ll be able to see your Instagram posts. With a private account, your Instagram posts will not appear in other users’ Discover tab.
A private Instagram account can be an excellent option for people who are just using Instagram in their personal lives. If your goal is to share life updates with only the people who know you, then a private Instagram account is for you. The image below is an example of a what a private Instagram account looks like to a non-follower.
Public Instagram account
If you’re using Instagram as a platform for your personal brand or business, then you’ll probably want to opt for a public Instagram account. (And, if you haven’t already, be sure to check out our ultimate guide on Instagram marketing.)
Not only will a public account make it easier for people to follow you (you won’t have to approve every request that comes through), your posts can also appear on Instagram users’ Discover tabs! That means there is a good chance users will stumble upon your account and discover your content organically.
If your goal is followers and engagement on your profile, or to ultimately run an Instagram business account, then a public account is more likely to help you reach those goals. The image below is what a public Instagram account looks like to a non-follower.

How to make Instagram private
Still convinced you want to have a private Instagram account? No problem! Grab your smartphone, open the Instagram app, and let’s get started!
1. Open Instagram and log in to your account
The first step is easy! Grab your phone, open up Instagram, and log in to your account. (Disclaimer: Our instructions and screenshots will show you how to switch your account to private from an iPhone. However, this is also possible from an Android or your desktop! These instructions should still help you get there.)
2. Navigate to your Instagram profile
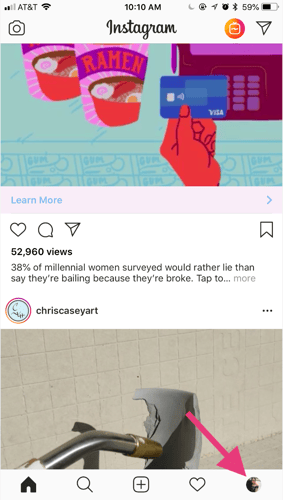
From the Instagram home page, navigate to your profile. There is a button in the bottom right corner that’s the same as your Instagram profile picture. Click that to be taken to your account.
3. Open up your settings
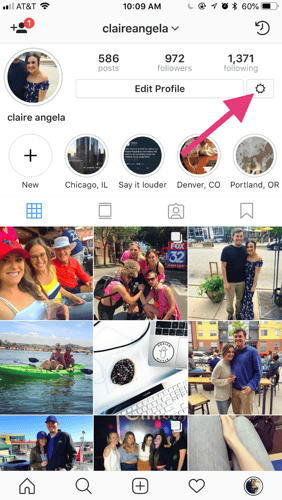
From your Instagram profile, open up your settings. This button is in the top right corner next to the “Edit Profile” bar. On iPhones, the settings button is a cog. On an Android, this button is an ellipsis.
4. Find the Privacy and Security tab on Instagram
When you open up your settings, you’ll find a long list of options regarding all of the ins and outs of your Instagram account. Resist the urge to go look at every post you’ve ever liked (it’s tempting, but you’ll be sucked in for hours) and continue down to the Privacy and Security tab.
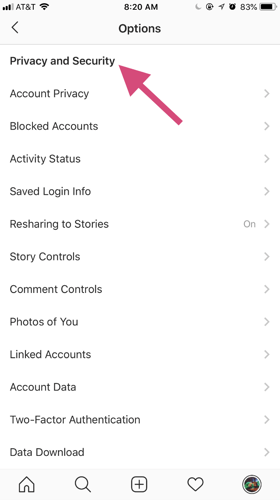
5. Click on Account Privacy and make the switch!
When you find the Privacy and Security tab, click the first button on the list says “Account Privacy.” From there, flip the switch on Private Account, and you’re done. Your Instagram account is officially private and only people you approve will be able to see your photos and videos.
Keep in mind that making this switch won’t affect your existing followers. Anybody who followed you before you went private will still be able to see your Instagram posts.
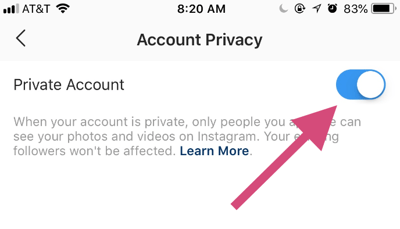
Your Instagram profile is officially private
It’s really that easy. Now that your profile is private, don’t forget you’ll have to approve any new follower requests. I hope this guide was easy to follow and left you feeling well-informed. See you next time!
 by Mara Calvello
 by Kristen McCabe
 by Alexa Drake