
If your business sends more than 5000 emails daily, DMARC is no longer optional.
Domain-based Message Authentication Reporting and Conformance, or DMARC dictates how receiving servers should handle emails from your domain that fail two other important email security standards: sender policy framework (SPF) and domain keys identified mail (DKIM).
Major email providers have mandated DMARC for all bulk email senders to prevent phishing and email spoofing.
Your question might be, “Well, how to set up DMARC for my domain?” Simple — you add a DMARC record to your website’s domain name system (DNS) record manually or with specialized DMARC software.
A DMARC DNS record is a TXT record (or text file) that tells mail servers what to do with emails that don't match SPF or DKIM authentication methods. DMARC records are published in a domain's DNS database under the name _dmarc.yourdomain.com.
Emails that fail to meet the checks mentioned in your DMARC record might be trying to impersonate your business, or they may come from unauthorized servers. It can damage your site's reputation.
To avoid this, the DMARC record gives instructions about how email providers should handle failed messages: do nothing, send to spam, or reject and report.
The DMARC record also sends you a DMARC report about the failed messages to your email address. In this way, DMARC provides domain-level protection against phishing, spoofing, and business email compromise. This safeguards your site’s reputation and improves email deliverability.
Read on to learn how to set up a DMARC record for your domain. If you want a primer on the topic before jumping into the DMARC record, read our beginner's guide to DMARC.
As mentioned earlier, a DMARC record is a line of plain text published in the DNS record. The syntax of a DMARC record comprises a host/name and tag-value pair separated by a semicolon:
1. Host/name defines the location of the record within your domain's DNS settings. It typically follows the format:
_dmarc.yourdomain.com
Often, you only need to add _dmarc in your DNS settings under the Host option.
2. Tag-value pairs define your DMARC policy and tell receiving email servers how to handle messages that claim to come from your domain. Each pair consists of:Let’s consider a domain called Skynet. Here’s a basic DMARC txt record for the domain:
Host: _dmarc
TXT record: v=DMARC1; p=none; rua=mailto:dmarc-reports@skynet.com;
This record has three basic tag-value pairs. The tags are version v, policy p, and the aggregate report. The corresponding value is DMARC1, none, and mailto: dmarc-reports@skynet.com. This DMARC record defines the policy as:
The two tag-value pair, v=dmarc1; p=none, are compulsory and must be listed first in any DMARC record. You can add other optional tags in any order. Major email providers like Yahoo! Mail, Gmail, and Microsoft Outlook generally recommend including the aggregate report or rua tag in the DMARC record.
Apart from version and policy tags, which are compulsory, there are nine other optional DMARC tags you should know about before creating your DMARC record.
| Tag | Description |
| v | The v tag specifies the version of the DMARC protocol. It must be the first tag in the record. The value is always DMARC1. |
| p |
The p tag defines the policy for handling emails that fail DMARC checks. Here are the possible values.
This tag is mandatory and should follow the version tag. |
| rua |
The rua tag specifies the email address(es) to receive aggregate DMARC reports. Aggregate DMARC reports list the failed messages and which authentication they failed. The email addresses follow the prefix “mailto:” and are separated by a comma. Example: rua=mailto:dmarc-admin@skynet.com, mailto:dmarc-reports@skynet.com; This tag is optional but recommended by all major email providers for security. |
| ruf |
ruf specifies the email address(es) to receive forensic DMARC reports. Forensic or DMARC failure reports include from and to address, subject line and message ID, time of message, and other details. The syntax is similar to the rua tag and is also optional. Example: ruf=mailto:dmarc-forensic-report@skynet.com |
| adkim |
This tag specifies the DKIM alignment policy, defining how strictly the email information must match DKIM signatures. There are two possible values.
Example: If the DKIM signature is d=skynet.com and the "From" address is @mail.skynet.com, the strict alignment would not consider this a match, and the dkim check will fail. However, the same email ID passes the DKIM check if the DKIM alignment is relaxed. This tag is optional but recommended for strong email security |
| aspf |
The aspf tag specifies the SPF alignment policy, defining how strictly the mail information must match the SPF signature. Like the adkim tag, it has two possible values.
The tag is also optional but recommended by email providers. Example: If the Mail From address included in the SPF record is mail.skynet.com and the "From" address is @skynet.com, the strict alignment would not consider this a match, and the spf check would fail. However, the same email ID passes the SPF check if the SPF alignment is relaxed. |
| pct |
This tag specifies the SPF alignment policy, defining This tag specifies the percentage of unauthenticated messages subjected to the DMARC policy. It can be any whole number from 1 to 100. The default value is 100%, meaning all unauthenticated messages are subject to the DMARC policy. |
| sp |
The sp tag specifies the policy for handling emails from subdomains. Like the policy tag, the sp has three possible values: none, quarantine, or reject. This tag comes in handy if you have subdomains for which you want a different DMARC policy. If you don’t mention the specific policy for the subdomain with an sp tag, it inherits the DMARC policy of the parent domain itself. |
| fo |
The failure reporting options, or fo, tag specifies options for generating failure reports. The tag can take one or more of the following values:
You can combine multiple options to customize the failure reporting behavior with a colon in between the values. Example: fo=0:d will generate reports for messages that failed both SPF and DKIM authentication together, as well as for any SPF-specific failures. You can skip this tag if you don’t need it. |
| ri |
The report interval, or ri, tag specifies how often aggregate reports should be sent in seconds. Aggregate reports are generated every day so the default option is 86,400 seconds (one day). The ri tag is optional. |
| rf | This report format tag is optional; it specifies the format for the generated DMARC report. Currently, there’s only one accepted format – authentication failure reporting format (afrf). So, by default, the tag is written as rf=afrf. |
Note that your DMARC reports are in XML format, and manually reading them is cumbersome. Consider using DMARC software to automatically parse reports, generate data visualizations, and offer additional features to optimize DMARC management.
G2 connects security and IT teams with the right DMARC solutions to enforce authentication protocols, reduce phishing risk, and monitor domain abuse in real time.
*These are the top 5 DMARC software according to G2’s Winter 2026 Grid Report.
While the DMARC sounds technical, creating a DMARC record is relatively easy. We’ll create a DMARC record for skynet.com and add it to the DNS records. Replace “skynet.com” with your domain name when you do yours.
If you don't set up SPF and DKIM before enabling DMARC, messages that come from your domain will probably have delivery issues.
If you use a third-party service provider like an email marketing tool, sales and CRM platforms, and customer support solutions to send your emails, contact them to confirm that DKIM is set up correctly. The provider’s sender domain should match yours. Add to your domain’s SPF record the IP address of the servers your third-party provider uses to send messages.
Tip: Allow 48 hours after adding SPF and DKIM records to your DNS before setting up DMARC to avoid any DNS propagation issues.
Depending on how many emails your organization sends, the DMARC report emails might overwhelm your inbox. Create a dedicated email ID exclusively for DMARC reports. It can be a simple dmarc-report@yourdomain.com.
Tip: Set up a separate mailbox for receiving forensic reports if you opt for them.
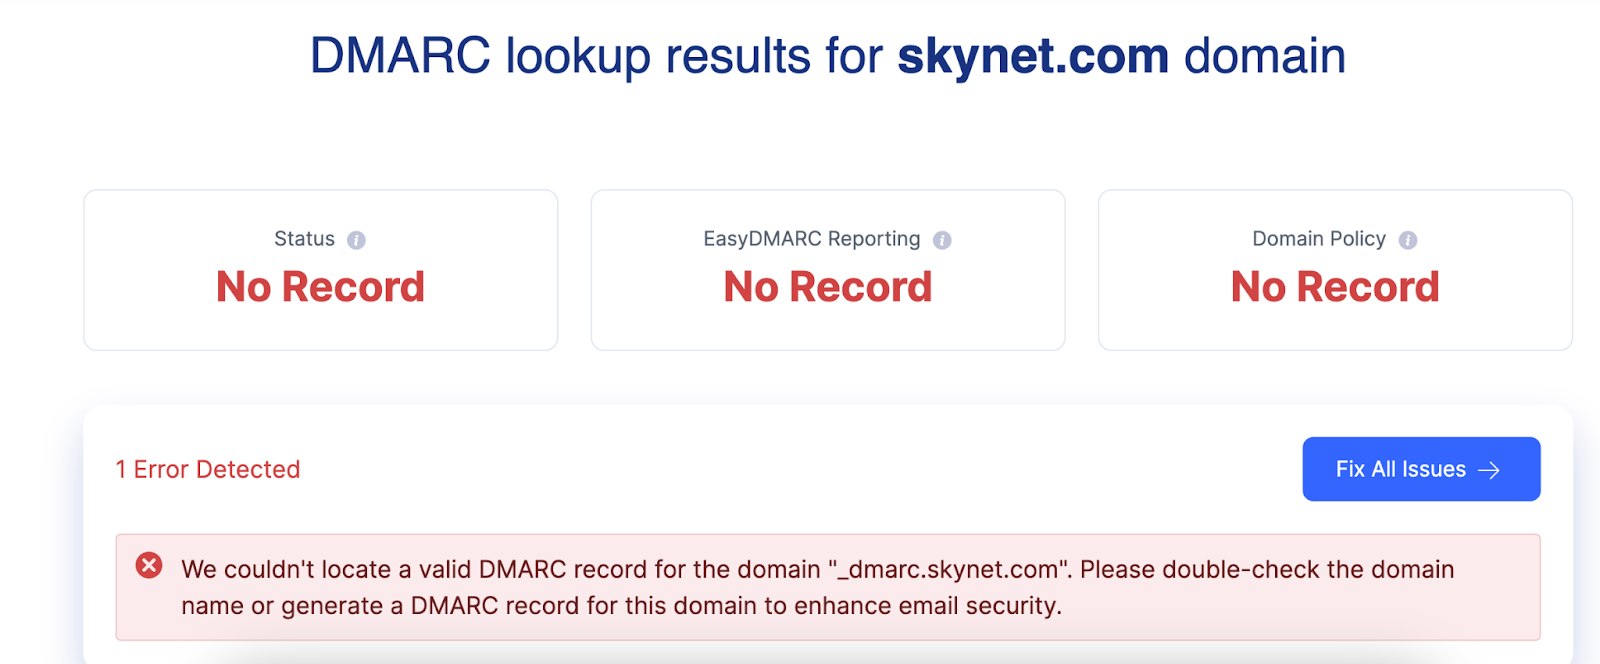
This one is optional, but if you’re unsure whether your domain already has DMARC enabled, check it using an online DMARC checker tool. I used EasyDMARC’s DMARC lookup tool to check the domain skynet.com and got the error message. That means we definitely need to set up DMARC here.
Source: Screenshot from EasyDMARC
As mentioned earlier, you can generate a DMARC record manually or by using an online DMARC record generator. But for both options, you must be clear about your DMARC policy, alignment options, and email in order to get reports.
Major mail providers recommend starting with a relaxed DMARC policy so let’s choose p=none and apply it to all emails sent from our domain skynet.com. We won’t mention anything about SPF and DKIM alignment or subdomain policy at this point.
Copy the following sample DMARC record and replace the domain name.
Host: _dmarc
TXT record: v=DMARC1; p=none; rua=mailto:dmarc-report@skynet.com; pct=100%;
Alternatively, you can also use our free DMARC record generator here to create a record similar to the example above.
To edit your DNS record and add the DMARC record, log into your website host. If you're unsure where the DNS record is, here are the common places to look based on your domain setup:
Log in to your registrar’s or the web host’s account and search for sections related to "DNS," "Domain Management," or "Advanced Settings". For example, in GoDaddy, you’ll find the DNS option next to your domain name under the “My Products” tab once you log in.
Tip: If you forgot your domain registrar, use a free WHOIS lookup tool online, like ICANN Lookup or Whois.com, to retrieve your domain registrar information. You can also search your inbox for the confirmation mail you received when you bought the domain.
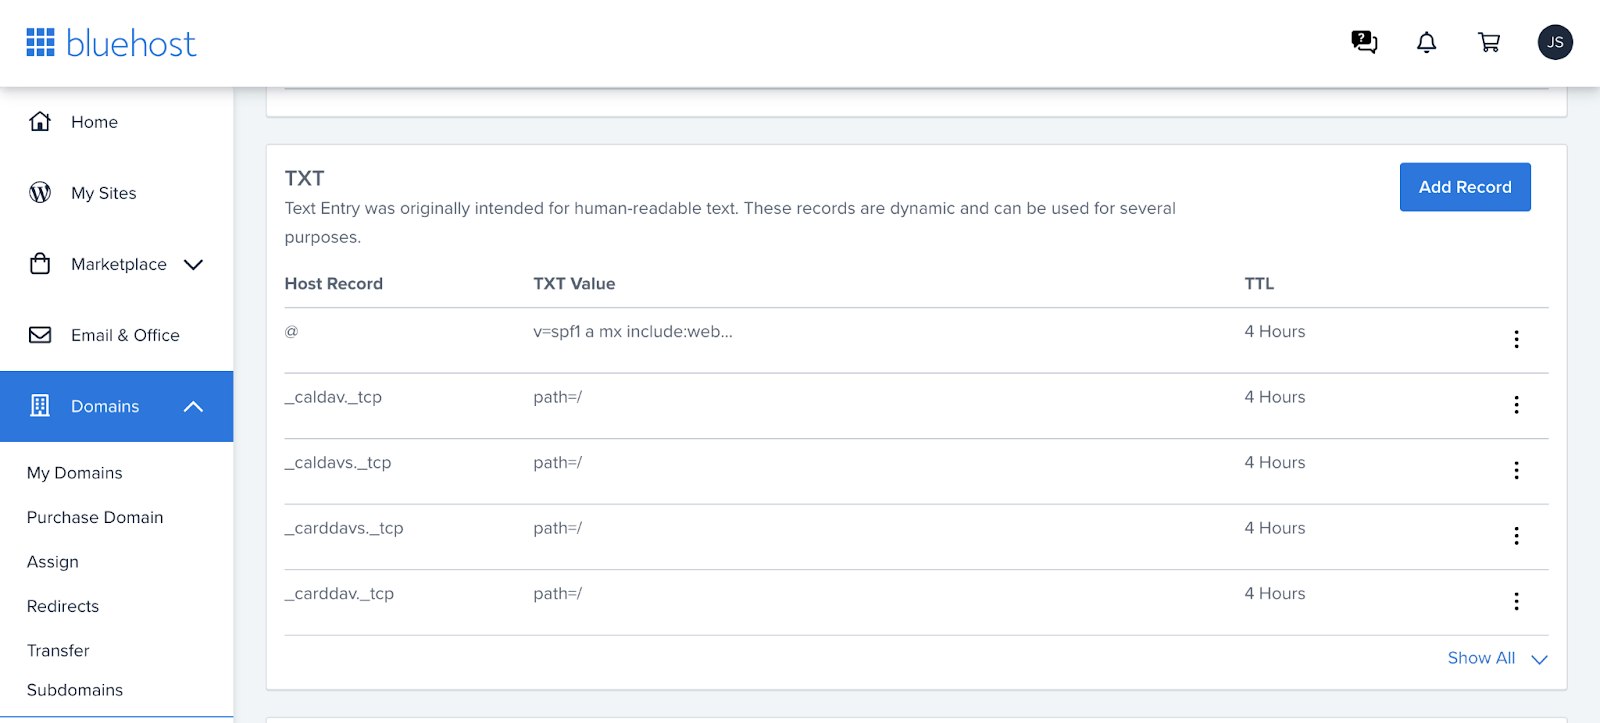
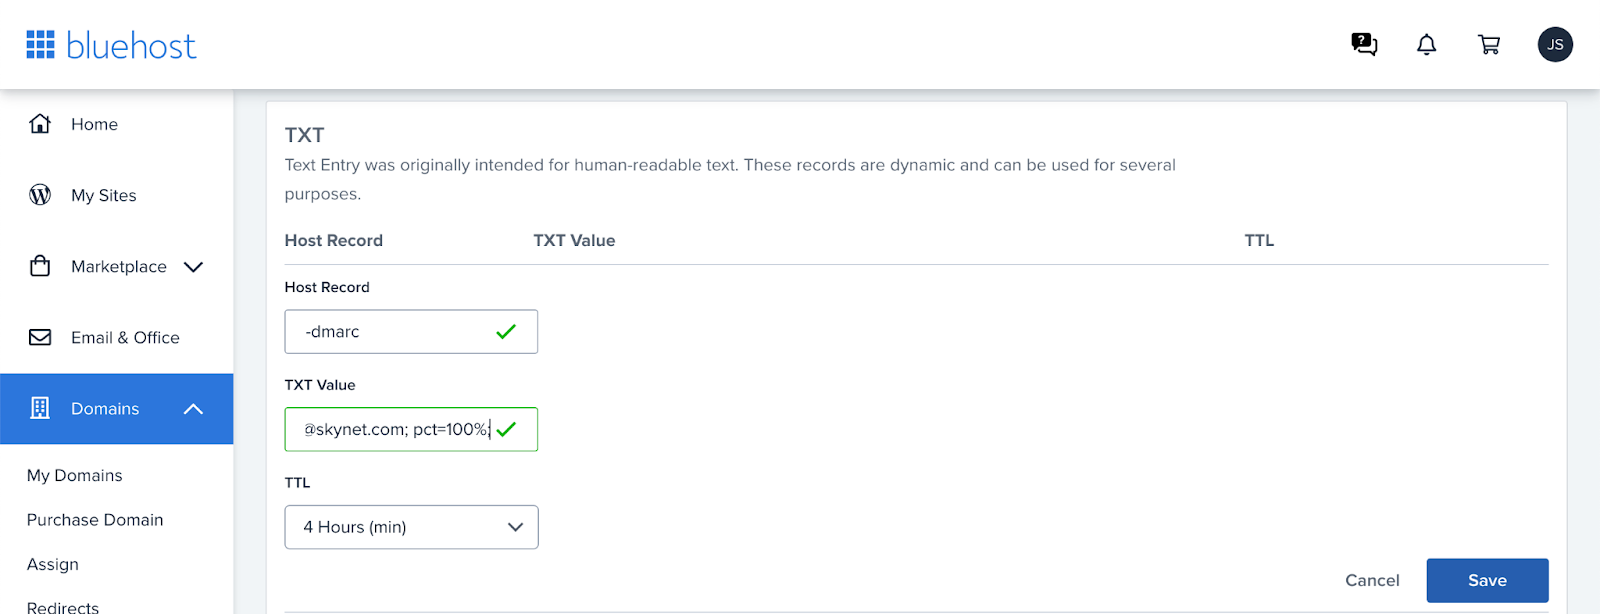
Once you find out where to add a DNS record, select “TXT” under record type and enter the details of your TXT record:
While not essential, you can set the Time To Live (TTL) value for your DMARC record. This determines how long other DNS servers have the record before refreshing it with your registrar. Leave the TTL setting on automatic; it is typically 4 hours.
Save the changes and wait for the DNS propagation, which can take up to 48 hours.
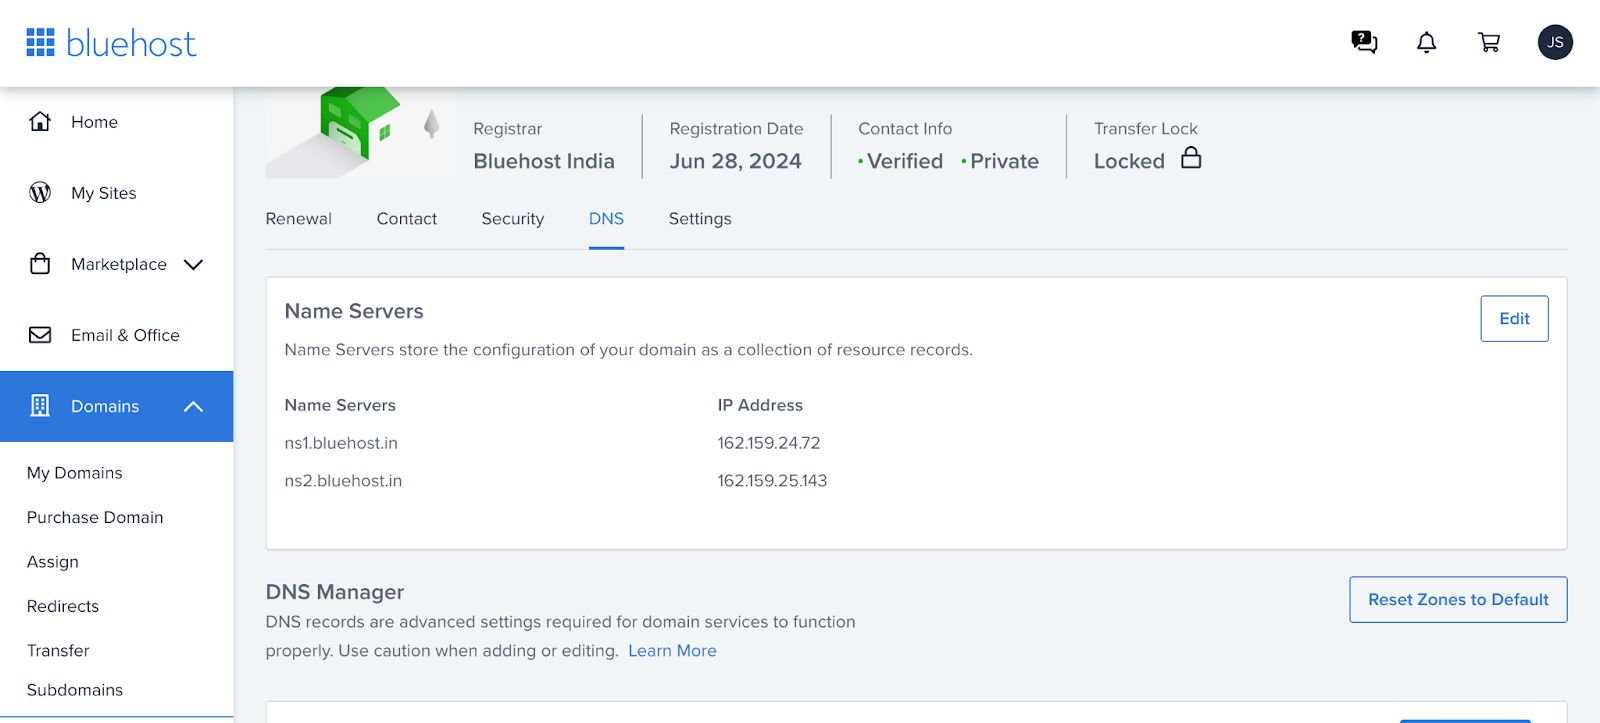
For instance, here’s how you publish DMARC records in BlueHost.
Source: Screenshot from BlueHost
Source: Screenshot from BlueHost
Source: Screenshot from BlueHost
GoDaddy also has a similar process. Log in to your GoDaddy account and go to Domain Portfolio. Under Domain Name, select your domain, and then select DNS. Choose Add New Record and enter the DMARC record details. Click Save.
The DMARC setup steps match other domain registrars or hosts and CDNs, including:
Important: The steps outlined are generalities. If you’re unclear about anything, please refer to the documentation of your web host, domain registrar, or CDN provider for specific instructions.
Use any one of the DMARC checkers mentioned above to verify that you have published the record correctly. In a few days, you’ll start getting DMARC reports in your dedicated mailbox.
Reviewing the DMARC reports gives insights into:
Monitor your DMARC reports for seven days, and if your emails haven’t experienced any major issues, implement a strict policy of p=quarantine.
v=DMARC1; p=quarantine;rua=mailto:dmarc-report@skynet.com; pct=10;
For this case, the DMARC policy applies to 10% of your emails, and the messages that fail DMARC checks will be sent to the receiver’s spam folder.
If you’re a large organization, set the percentage of emails to 5% and gradually increase it. Add the record and monitor the DMARC reports to find out how many emails are missing DMARC checks. When most of your emails pass the DMARC checks, enforce the p=reject policy.
v=DMARC1; p=reject;rua=mailto:dmarc-report@skynet.com;
This applies to all emails in your domain. Any message that fails DMARC will be rejected outright and you’ll get aggregate reports about the failed emails.
Got more questions? We have the answers.
A. You generate a DMARC record manually or by using an online DMARC record generator.
A. You can only have one DMARC record for your domain.
A. Your DMARC record can take anywhere from a few hours to 48 hours to spread across DNS servers. In most cases, it should be updated within 24 hours.
A. If there's no DMARC record for personal email users, there’s no issue. However, for bulk email senders, if your domain does not have a DMARC record, several issues can arise. Firstly, your domain becomes more vulnerable to email spoofing and phishing attacks because no policy exists to verify the authenticity of emails sent from your domain.
Additionally, the lack of DMARC can result in lower email deliverability rates, as email providers are more likely to flag your emails as spam or reject them altogether due to the absence of proper authentication measures.
A. SPF validates the sender's IP address, DKIM uses cryptographic signatures, and DMARC ties them together by specifying what to do when one or both fail. DMARC also enables reporting.
A. DMARC aggregate reports are XML files showing authentication results by source IP, domain alignment, and outcome. Use DMARC software to parse and visualize the data.
A. By default, subdomains inherit the parent domain’s DMARC policy. Use the sp tag if you want a different policy for subdomains.
Now you know how to set up DMARC for your domain. Follow the steps mentioned here and add the DMARC txt record to your DNS record. Implementing DMARC significantly enhances your domain’s reputation and safeguards against email fraud. A phased approach allows for careful monitoring and adjustments, ensuring a smooth transition to a secure email environment. Remember, DMARC is not a one-time setup; regular review and updates are essential to maintain optimal protection.
Want to take one more step toward enhanced email security? Explore brand indicators for message identification (BIMI), the latest email authentication standard that all businesses are adopting.
This article was originally published in 2024. It has been updated with new information.


Your email reputation can make or break a campaign. But what happens when your carefully...
.png) by Tanuja Bahirat
by Tanuja Bahirat

If you send a lot of emails as part of your work or if you own a website domain, you need to...
 by Rob Bowker

In today's digital age, having a strong online presence for your business is essential.
 by Mara Calvello