November 17, 2022
 by Deirdre O'Donoghue / November 17, 2022

How do shoppers gain trust in the e-commerce world?
You may think that if your products are good enough, then they’ll sell. But without the right product photography, potential customers will buy from the competition.
Product photography, sometimes called e-commerce photography, are photos taken for a website or social media platforms to help sell a product or service.
Thanks to the rise of online shopping, its crucial photos illustrate what your brand is selling and why it’s worth purchasing. It’s common to use photo editing software to edit and modify pictures of products to ensure they look as professional and attractive as possible to help influence buying decisions and increase sales.
Product photography on an e-commerce website is meant to engage potential shoppers, show them what they are getting, and sell them on the product itself. When your product photography is accurate and engaging, shoppers will learn to trust your brand. Typically, in brick-and-mortar stores, you can trust the product because you can touch and feel the product itself. This type of physical trust is lost in e-commerce stores.
Product photography uses techniques to showcase products in an enticing and informational manner.
Product photography isn’t one-size-fits-all, and there are different styles you can choose from for your products. Here are the most common types of product photography shots you can choose from to create a personalized product image story.
There are some items that are necessary for getting the right shot. Keep in mind that this list is just the basics in order to keep costs lower. If you have a higher budget, you can invest in more high-quality products.
You don’t have to buy a fancy, new camera to take photos of products. For example, the iPhone 14 has a dual-camera system with its main camera offering 26 mm, ƒ/1.5 aperture, sensor‑shift optical image stabilization, seven‑element lens, and 100% Focus Pixels. There are also options for night mode, panoramic photos, portrait mode, and Wide color capture for photos and Live Photos. So no matter what type of product you're photographing, chances are good your smartphone camera can capture it perfectly.
Using a tripod helps stabilize the camera when taking photos. Because product photos need to be clear and focused, a tripod eliminates the possibility of uneasy hands ruining a photo. Tripods also help standardize your photos. For example, if you’re taking pictures of different water bottles, you wouldn’t want all the different bottles to be shot from different angles. Luckily, tripods are relatively inexpensive and the difference they make is worth it.
You can opt for a traditional tripod or one with a mobile grip.
Depending on the product you’re photographing, you’ll need to find the right surface for the photoshoot. It's best to opt for a standard, 24-27 inch wide table. If you’re photographing a product in-situation, then you may want to consider other surfaces.
Light is one of the trickiest things to master when it comes to product photography. A bounce card helps fill light into the shadows. You can do this by positioning the card facing the natural light, which causes the light to reflect into the shadows.
Unless you’ve decided to shoot a product in context, more times than not you will need a neutral background, like white, gray, or beige, for the photoshoot.
Having a neutral background will make the editing process much easier. It will be simple to edit your product photo, cut it out of the background, and place it wherever needed in the future, like an advertisement or website homepage.
You can also use a light tent to ensure you have control of the light, background, and environment. A light tent, also referred to as a lightbox, is a box lined with white paper that where you can strategically place lighting.
Not only is product photography imperative to an e-commerce store, but it’s also an integral part of advertising campaigns. Whether you’re selling on Amazon, selling wholesale, or have your own e-commerce shop, it’s important to prioritize your product photographs. Not only do they show up on your website, but they also form your brand awareness through social media.
Some people are naturally skilled photographers, but if your bread and butter is the business side of things and not the art, there are some steps you can take to ensure you take quality product photos for your website.
If you’re selling on Amazon, there are very detailed specifications each photo must fulfill. Similar to other e-commerce platforms, each of these platforms have a variety of requirements for photos. Before you start shooting, integrate these specifications into your plan so you are ready to upload the photos right after they’re retouched.
Whatever you do, do not begin a shoot without making a detailed plan. Before the photoshoot, sketch out what photos you want to capture. Be sure to note any props needed, necessary angles, and certain lighting. A simple sketch, mood board, or general outline will do, but without a plan, you will end up wasting more time and money either reshooting or retouching.
First, you must choose between natural light or artificial light. Natural light is light that comes from sunlight, even if it’s through a window. Since you cannot control the level of natural light, using tools like the lightbox, a white background, or a bounce card can help control the light. It’s always better to have too much light than too little.
One aspect of photography people oftentimes forget is shadows. Your product is the hero, not the shadows, so do all that you can to use tools to minimize shadows.
If you don’t have any natural light, then you will have to create artificial light. Have a key light placed in front of the product, then fill the back with light either using another light or a bounce card.
Whether you're shooting product-only images or in-context images, make sure that your photos are realistic. For example, don’t make a bag of candy look much larger than it actually or you will have disappointed and confused customers. Or in context, don’t show a cleaning product doing more than it actually can do. The more realistic you are with your images, the happier your customers will be.
For example, below is a product-only shot from the Bath and Body Works website, showing a fragrance plug-in.

Source: Bath and Body Works
Also shown is an in-context image of the same product, which helps customers see it not only in-use, but also get a better idea of its size.

Source: Bath and Body Works
Both photos are incredibly helpful to show customers exactly what type of product they're about to purchase.
You never know what angle might turn out as the best shot or what needs you may have down the line. If you have a plethora of photos to choose from, then there’s a lower chance you’ll need to do a reshoot in the future. And, depending on the product your company is selling, you may want more than one photo for your customers to see.
For instance, if your brand sells clothing, you'll want to feature multiple photos from different angles, on different size models, and in different settings.
To achieve a polished and professional photo, you must retouch the photos. If you are not retouching photos yourself, then this process will be the most expensive part of the product photography process.
 Retouched photo
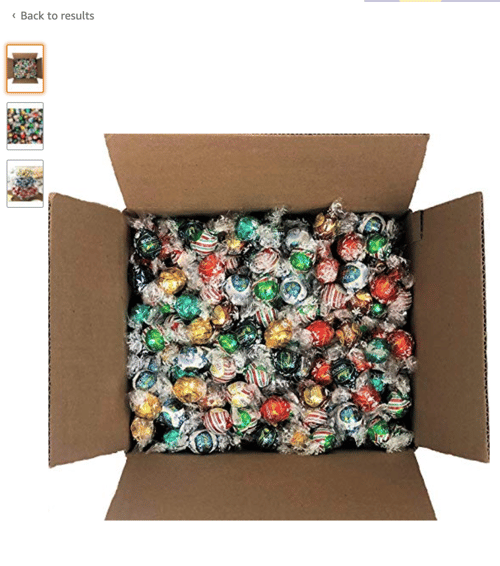 Not retouched photo
Looking at the way Lindt LINDOR Truffles are represented on Amazon you can tell that there’s a good way to do product photography and a bad way.
The first image was retouched and they added text to the photo to tell more of a story that the shopper may need. The second image with the large box of truffles leaves shoppers with more questions. What kinds of truffles are in the box? How many truffles? Will they all be melted once they arrive at my home? Think about the shopper first and any questions they may have before they purchase.
When using photos on a website, make sure they're sized correctly and saved in the right file format. Different website layouts and social media platforms require different sizes and resolution. So, be sure your photos aren't blurry or too small. Similarly, if your photos are too large, they may slow down load time on your website.
Photography is an art, but with these tips, you’ll be on your way to mastering the craft and selling more products than you could’ve imagined.
Don't lose all your hard work! Learn more about photo management and how to properly store all of your pictures and images in one central location.
This article was originally published in 2019. It has been updated with new information.
Deirdre O’Donoghue is a Content Manager at Nature's Fynd and a former Content Manager at G2. In her free time, you can find Deirdre fostering puppies or exploring the Chicago foodie scene. (she/her/hers)
Before Instagram exploded, we had Flickr.
 by Grace Pinegar
You want to make your blog or landing page stand out using professional images, you just don’t...
 by Devin Pickell
Before Instagram exploded, we had Flickr.
 by Grace Pinegar
