App designing is a costly endeavor, even more so when usability problems aren’t identified, bugs are prevalent, and customer expectations aren’t met after a launch.
Once you start to think about how to make an app, remember that poor design will annoy your customers and damage your brand, possibly irreparably. Thus, testing features out with potential users before your product is released (as early as possible) will help you minimize expenses as well as keep your customers happy. Prototyping does exactly that, helping you to communicate designs and optimize usability for apps often without the need to write a single line of code.
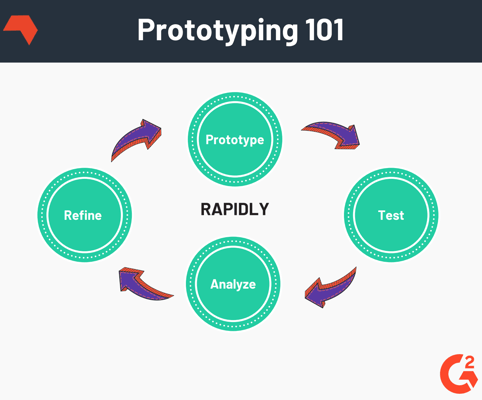
Rapid prototyping is a fast visualization of how an app or one of its features would function in the real world.
If your aim is to develop an app worthy of millions of customers, prototyping should be within your radar. Using the right tools, owners can test their ideas and make needed improvements before costly app development begins.
OR
GIFs courtesy of www.fluidui.com
App prototyping and the tools that go with it have only evolved recently. However, the concept of prototyping and iterative development began in the 1980s when hardware manufacturers wanted to model and test how customers use their products before committing to large scale production rollouts. Fast forward to today, practically every computer program and hardware device passes through some form of prototyping process, ensuring everything runs smoothly before customers buy and use it.
| TIP: Building your first app? Learn how much it costs to make an app in 2019 to budget correctly. |
No matter the industry, prototyping has a place. Prototyping is widely used across both software and hardware industries including: 3D Printing, app and website design, motor vehicles, medical equipment and more.
The prototyping process for apps and the different tools you can use vary in terms of applicability, speed, and complexity. Some tools are designed for early stage prototyping and ideation, suitable for founders, product owners, and idea people. Other, more complex tools are commonly used by professional designers to create photo-realistic level prototypes.
Image courtesy of Jennifer Hou
As with anything, it is important to plan out your goals in advance. To produce optimal results, prototyping has steps that need to be followed if you want the process to be a success. Below is a simple guide below that will help you properly prototype your app, no matter your needs.

The level of detail you go into will depend on the stage of your project. Start by looking at your budget and time constraints. Set a strict deadline upon which your prototype can be built and tested with real people. Pick the right prototyping software tool (or use one you are already familiar with). Ideally this should be one that allows you to create a prototype and get it running on your mobile without needing any code or developers to help. The minute code starts to get written, costs start to rise quickly and changes get far more difficult to make.
Now, onto the steps:
Start by creating a generalized mock-up of your idea by visualizing your product with features you want to test: key areas of interest, main features, skipping secondary areas like what happens when errors are encountered, login, and settings screens.
Once you’re ready, you can share the prototype with a carefully curated list of users you’ve compiled who match your potential audience and can give you valuable feedback. Customers tend to be more picky about features they want, which translates into getting much more honest feedback. If there are hidden issues, this particular testing stage can uncover them.
However, you should keep the audience small so you can get specific feedback from each person. Additionally, if the app works well, take into account that customers might want to see an even better version at the release.
Once you have both internal and external reviews in your hands and put all feedback together, you’ll have a much clearer picture of the app you can hand over to developers. Review comments and how successful your prototype is. Keep in mind that if needed, you can repeat the process several times for different features before actual development begins. The better the usability and the more features you can remove, the faster the development of the app will be. User testing can help prioritize features and help you decide what is most important to the users by prioritizing those things to get a product to market faster.
If you deem the project ready, the last step is easy – hand over the prototype and your documentation to the design and development team and check on their progress on a continuous basis. If everything is going smoothly, your prototyping process did its job splendidly. If not – the prototype can quickly be adjusted to add more detail and answer the new questions that pop out as you develop your app further.
Overall, prototyping comes in different levels of fidelity (accuracy) compared to the final app you want to release. Each of these differs in terms of time consumption, money needed to be created, and how complex your testing stage should be. An app will always get a high fidelity pass before development is complete - it's just a question of whether that pass is early in the development of your prototype or later, when the functionality is better understood.
There are three different types of design accuracy that app owners should consider when prototyping: visual, functional, and content accuracy.
For apps, there are two options: sketched or (high-) fidelity design. If you are looking for low-accuracy level, sketching prototyping can get the job done quickly and with nothing but a piece of paper and a pen. However, using rapid prototyping tools can help to create higher levels of fidelity quickly and have the added benefit of being more easily shareable – and – in some cases, produce a testable app that can be deployed to your device. Additionally, the higher the fidelity, the better the feedback.
This one is all about the interface and the usability of the app. Typically, an app will have a small number of primary activities (e.g. add to cart on Amazon or Play in a game), plus a larger number of secondary actions (sign in, update an account, search). The usability of an app depends on how well these are structured and presented. The right tools allow you to review the relationships between different screens, earning their keep.
At different levels of content accuracy, you can make text, images, wording, and other content in your app as real as a final release version. The low fidelity option is to quickly drag a few images from Google and add some placeholder text to get an overall feel for what you are thinking of doing.
There are numerous rapid prototyping tools available in the market, each having their own level of accuracy and ease of use depending on user experience level and project stage. Early stage tools that are easy to use even by non designers include Fluid UI, Balsamiq, and Moqups. More advanced tools for professional designers include Sketch, InVision, and Adobe Products like XD and Photoshop.
Be sure to choose a platform where rapid prototyping does the job for you if you do not have an experienced team in your company. Prototyping will significantly decrease your costs and gets the job done fairly quickly. Additionally, depending on how big your app is, we would suggest breaking your prototyping into two phases: a “quick and dirty” early phase to create a shared understanding of the project you are working on with your team, and a high fidelity phase which will feed into the actual development of the app.
Doing this results in the greatest likelihood of project success in terms of budget, timeline, stability, usability, and functionality.
Ready to learn more? Discover the best app marketing strategies for once your new application is live and how to make the best use of your app prototype.
Dave Kearney is the founder and CEO of Fluid UI - a prototyping tool which can help you design brilliant apps, simplify design workflows and bring your ideas to life. He’s not a designer by trade, but rather an entrepreneur who is passionate about eliminating bad user experiences anywhere and everywhere they may exist.
(This article is part two of a series on the benefits and approaches to app prototyping. See...
 by Dave Kearney
(This article is part two of a series on the benefits and approaches to app prototyping. See...
 by Dave Kearney


